How to Grow Cardamom — The Best Way to Grow Cardamom at Home
Everything you need to grow Elettaria cardamomum at home — from seed to harvest. Soil, watering, fertiliser, pests, and climate guides for UK, USA, India, Australia, indoors and in pots.
Cardamom grows best in dappled shade, high humidity (above 70%), and warm temperatures (18–35°C / 64–95°F). Plant in well-draining loamy soil at pH 6.0–6.8. Water 2–3 times weekly. Feed with balanced NPK fertiliser every 6–8 weeks. Plants grown from rhizome divisions produce pods in 2–3 years; from seed, 3–4 years. Once established, a cardamom plant produces for 15–20 years.
One Plant. Fifteen Years of Pods. Here’s Everything.
Most people who try to grow cardamom fail because of three things: too much sun, too little humidity, and not knowing where the pods actually grow. This guide fixes all three — and links to every deep-dive technique guide we’ve built. Whether you’re in the UK with a conservatory, in Florida with a garden bed, or anywhere in between, your setup is covered here.
Elettaria cardamomum — green cardamom, also called chhoti elaichi — is a perennial rhizome herb from the ginger family (Zingiberaceae), native to the Western Ghats of India. Plant it correctly once and it will reward you for 15–20 years. This is the hub: start here, go deep in the section that matters most to you.
“Cardamom is one of the most misunderstood plants to grow at home. People expect it to behave like a herb on a windowsill. It doesn’t. It needs consistent humidity, shade, and patience — but reward that with 15–20 years of pods from a single planting.”
Emily Rhodes — CardamomNectar Growing GuideThe Cardamom Plant — Elettaria cardamomum
Understanding the plant you are growing — essential first knowledgeWhat Does a Cardamom Plant Look Like?
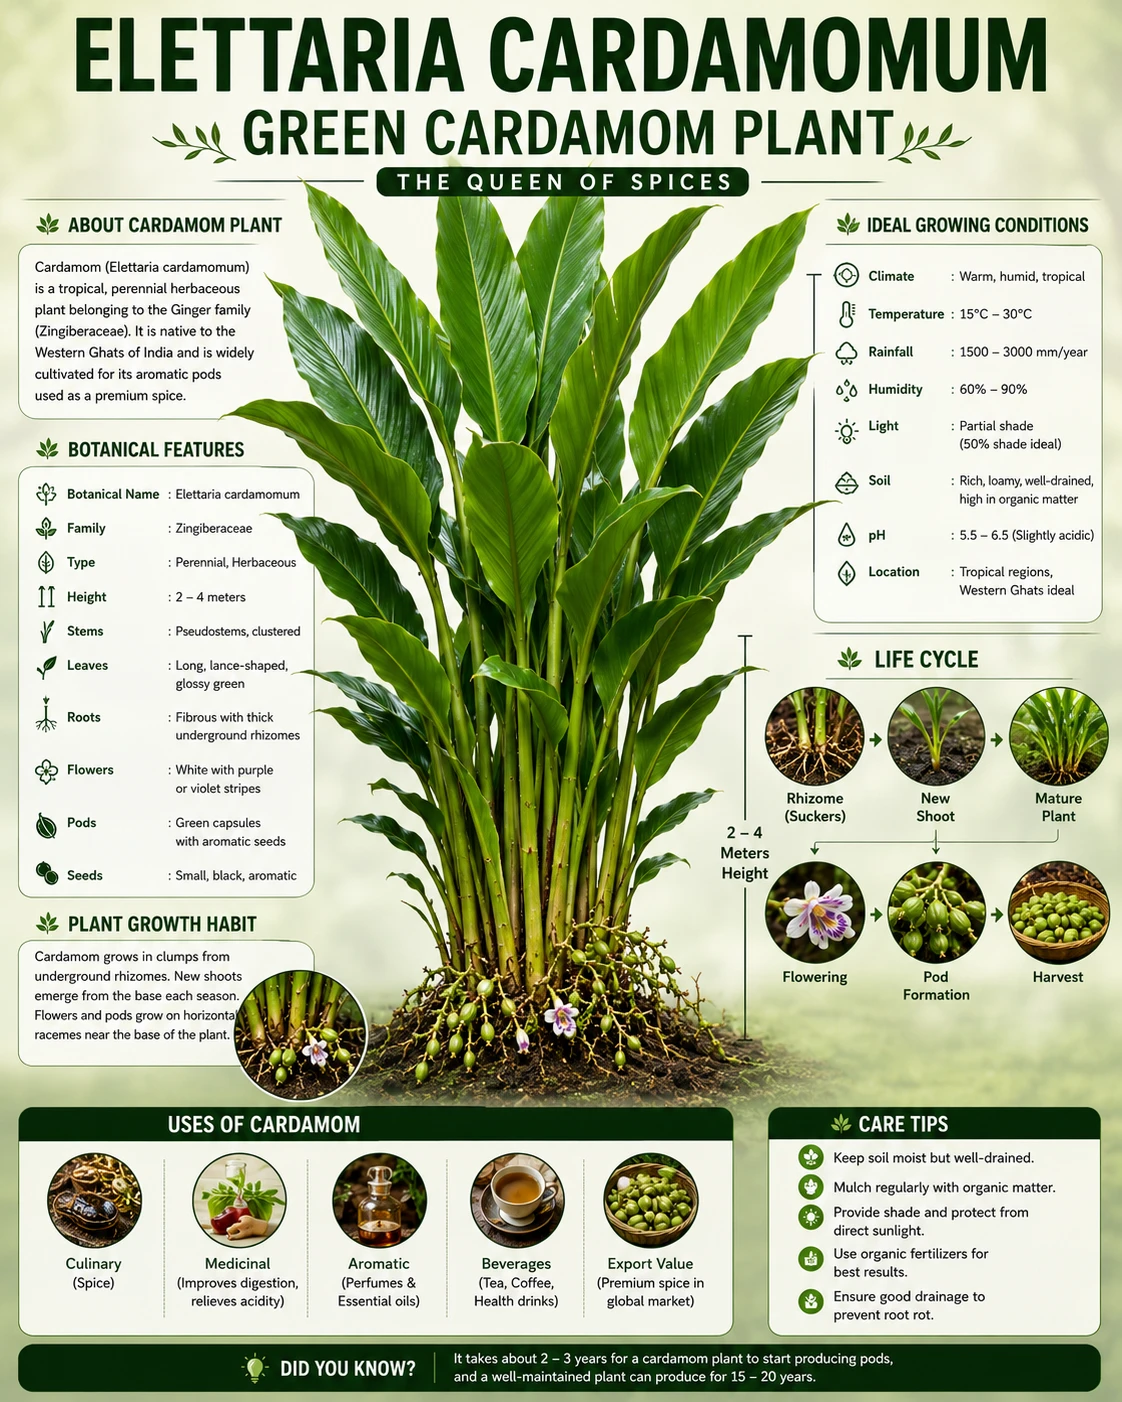
The cardamom plant is a tall, clumping perennial with long, lance-shaped glossy leaves that grow on reed-like pseudostems. Mature plants reach 1.5–5 metres in height. The leaves are bright green, smooth on top, and slightly hairy underneath, growing in two alternating rows on each stem.
The most distinctive feature is where the pods grow: not on the stem or in the leaves, but at the base of the plant on horizontal runners (racemes) at or just below soil level. This surprises most first-time growers. The white flowers with purple/violet striped lips appear on these same racemes before the green pods develop.
The plant spreads via underground rhizomes, gradually forming a clump over time. A well-established plant produces multiple pseudostems — each stem is annual, dying after 2–3 years while new shoots replace it from the rhizome.
Cardamom Plant Life Cycle
Understanding the growth timeline sets realistic expectations. Cardamom is a slow-maturing plant — this is the most important thing first-time growers need to know.
Cardamom Plant — Image Gallery
High-resolution reference images for every growth stage. Click any image to view full size and zoom.
 Mature Plant
Mature Cardamom Plant — Full Height
Grade-1 Elettaria cardamomum at 3+ years showing characteristic tall pseudostems, lance-shaped glossy leaves in two alternating rows, and the dense clumping growth habit from rhizome spread. Plants reach 1.5–5m under ideal conditions.
 Infographic
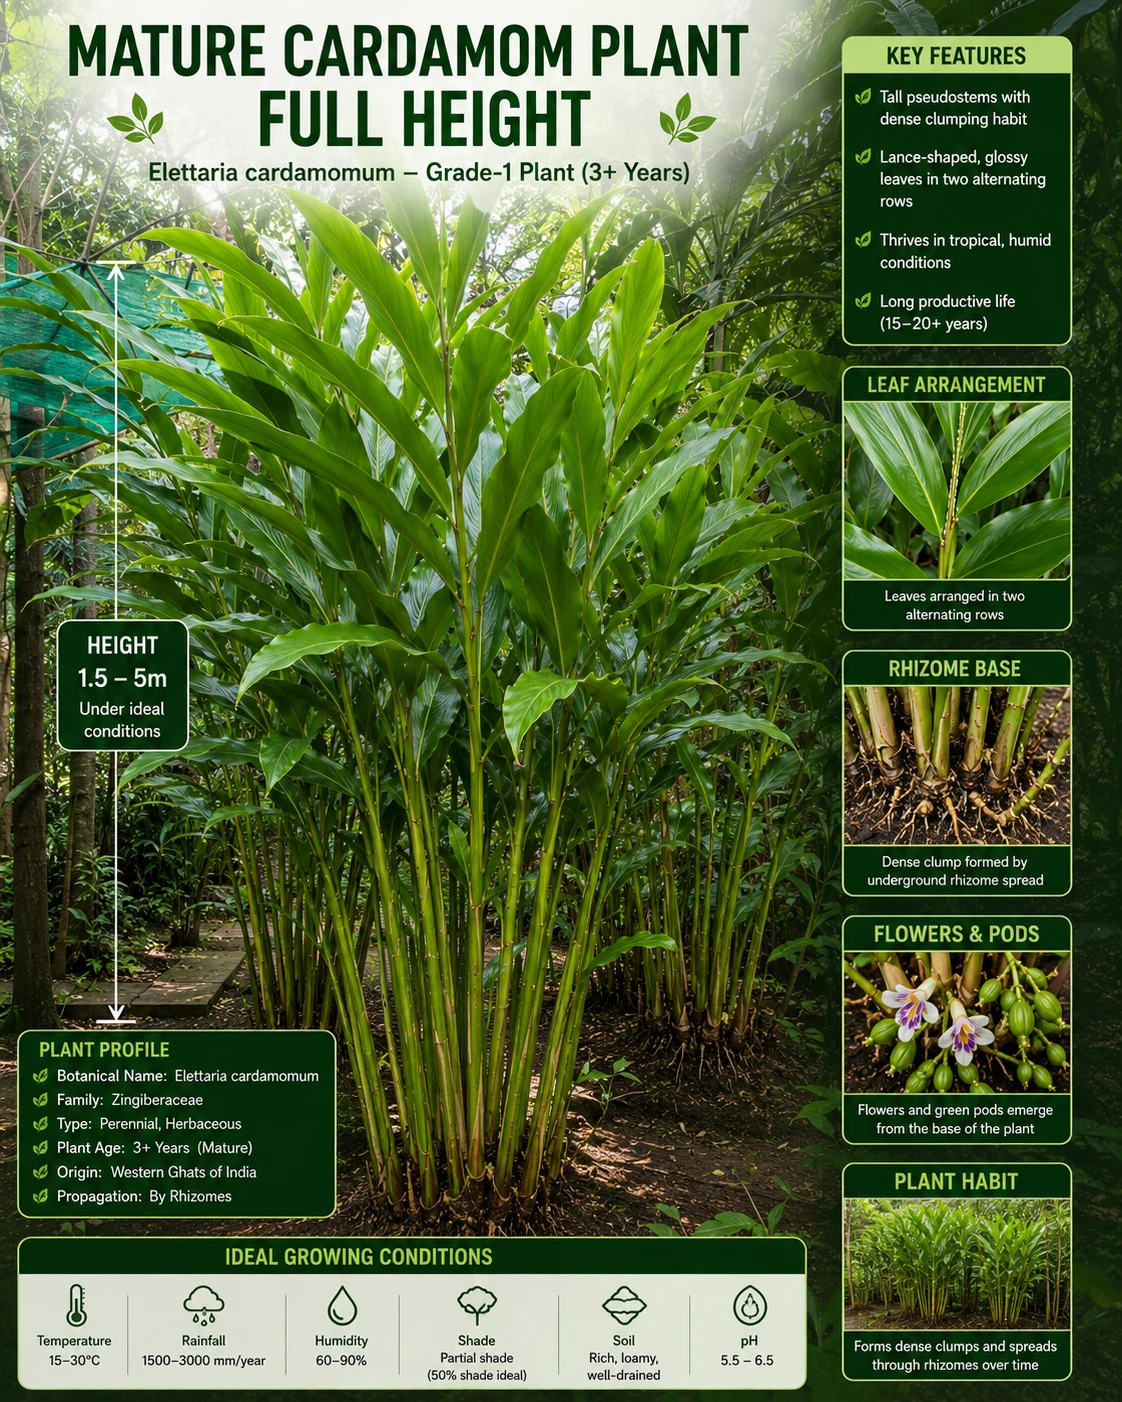
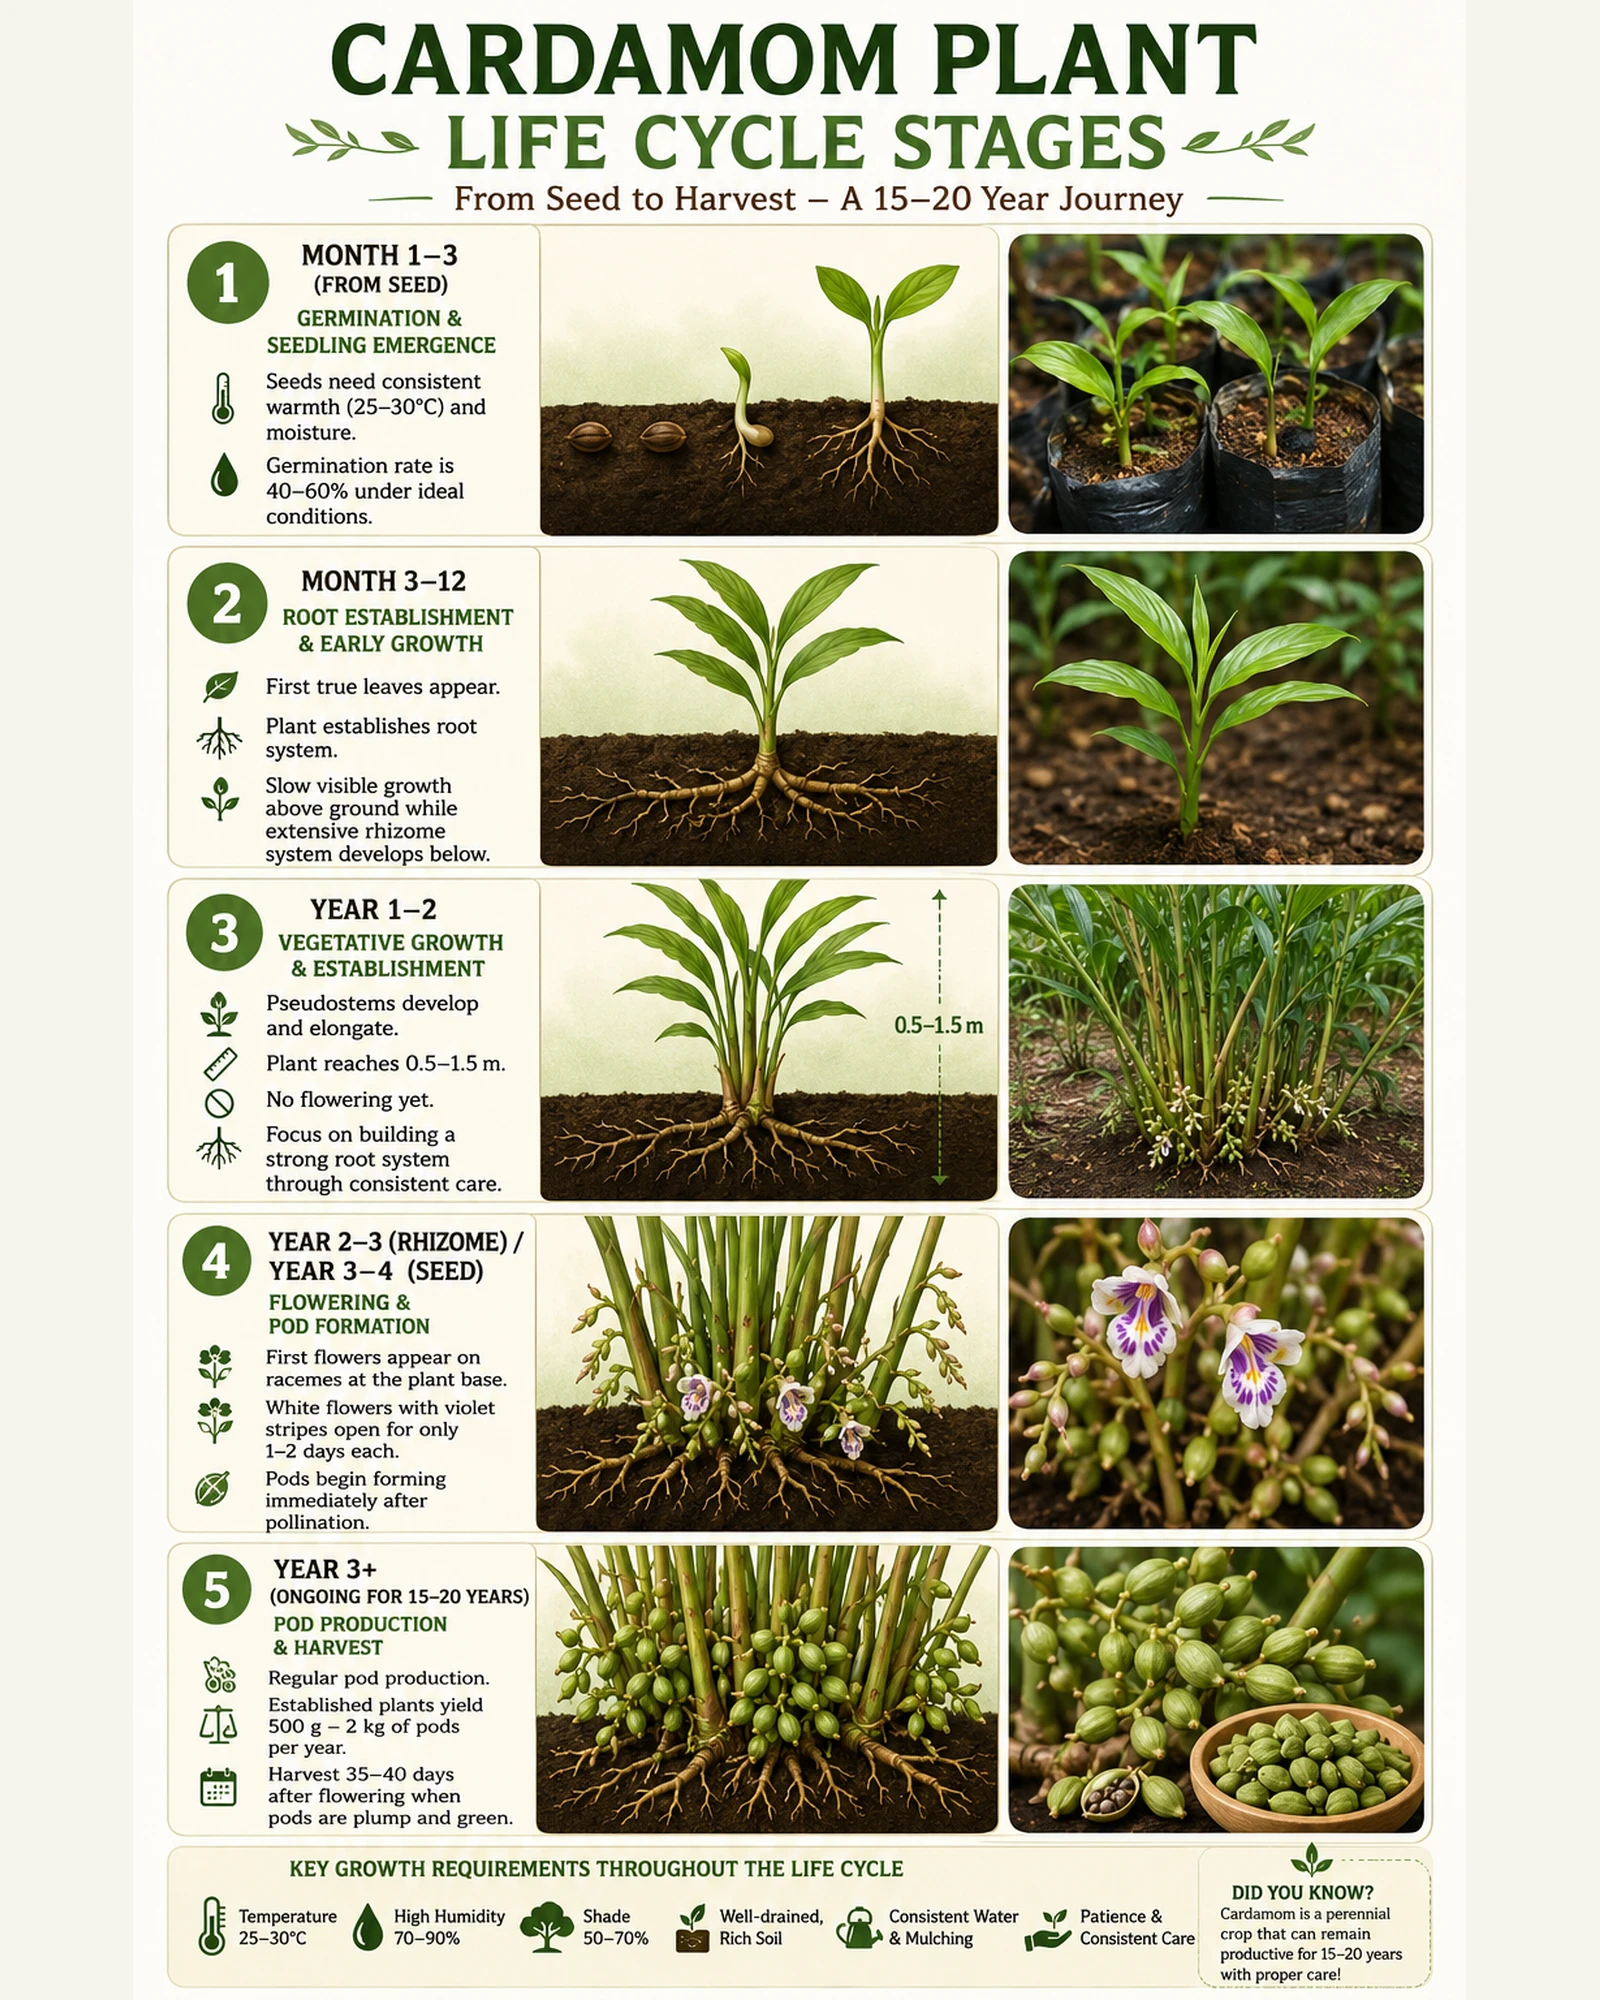
Cardamom Plant Life Cycle — Full Infographic
Complete visual reference of the cardamom growth timeline: seed germination (month 1–3), first true leaves, rhizome establishment, pseudostem elongation (year 1–2), first flowering (year 2–4), and ongoing pod production across a 15–20 year productive lifespan.
 Germination
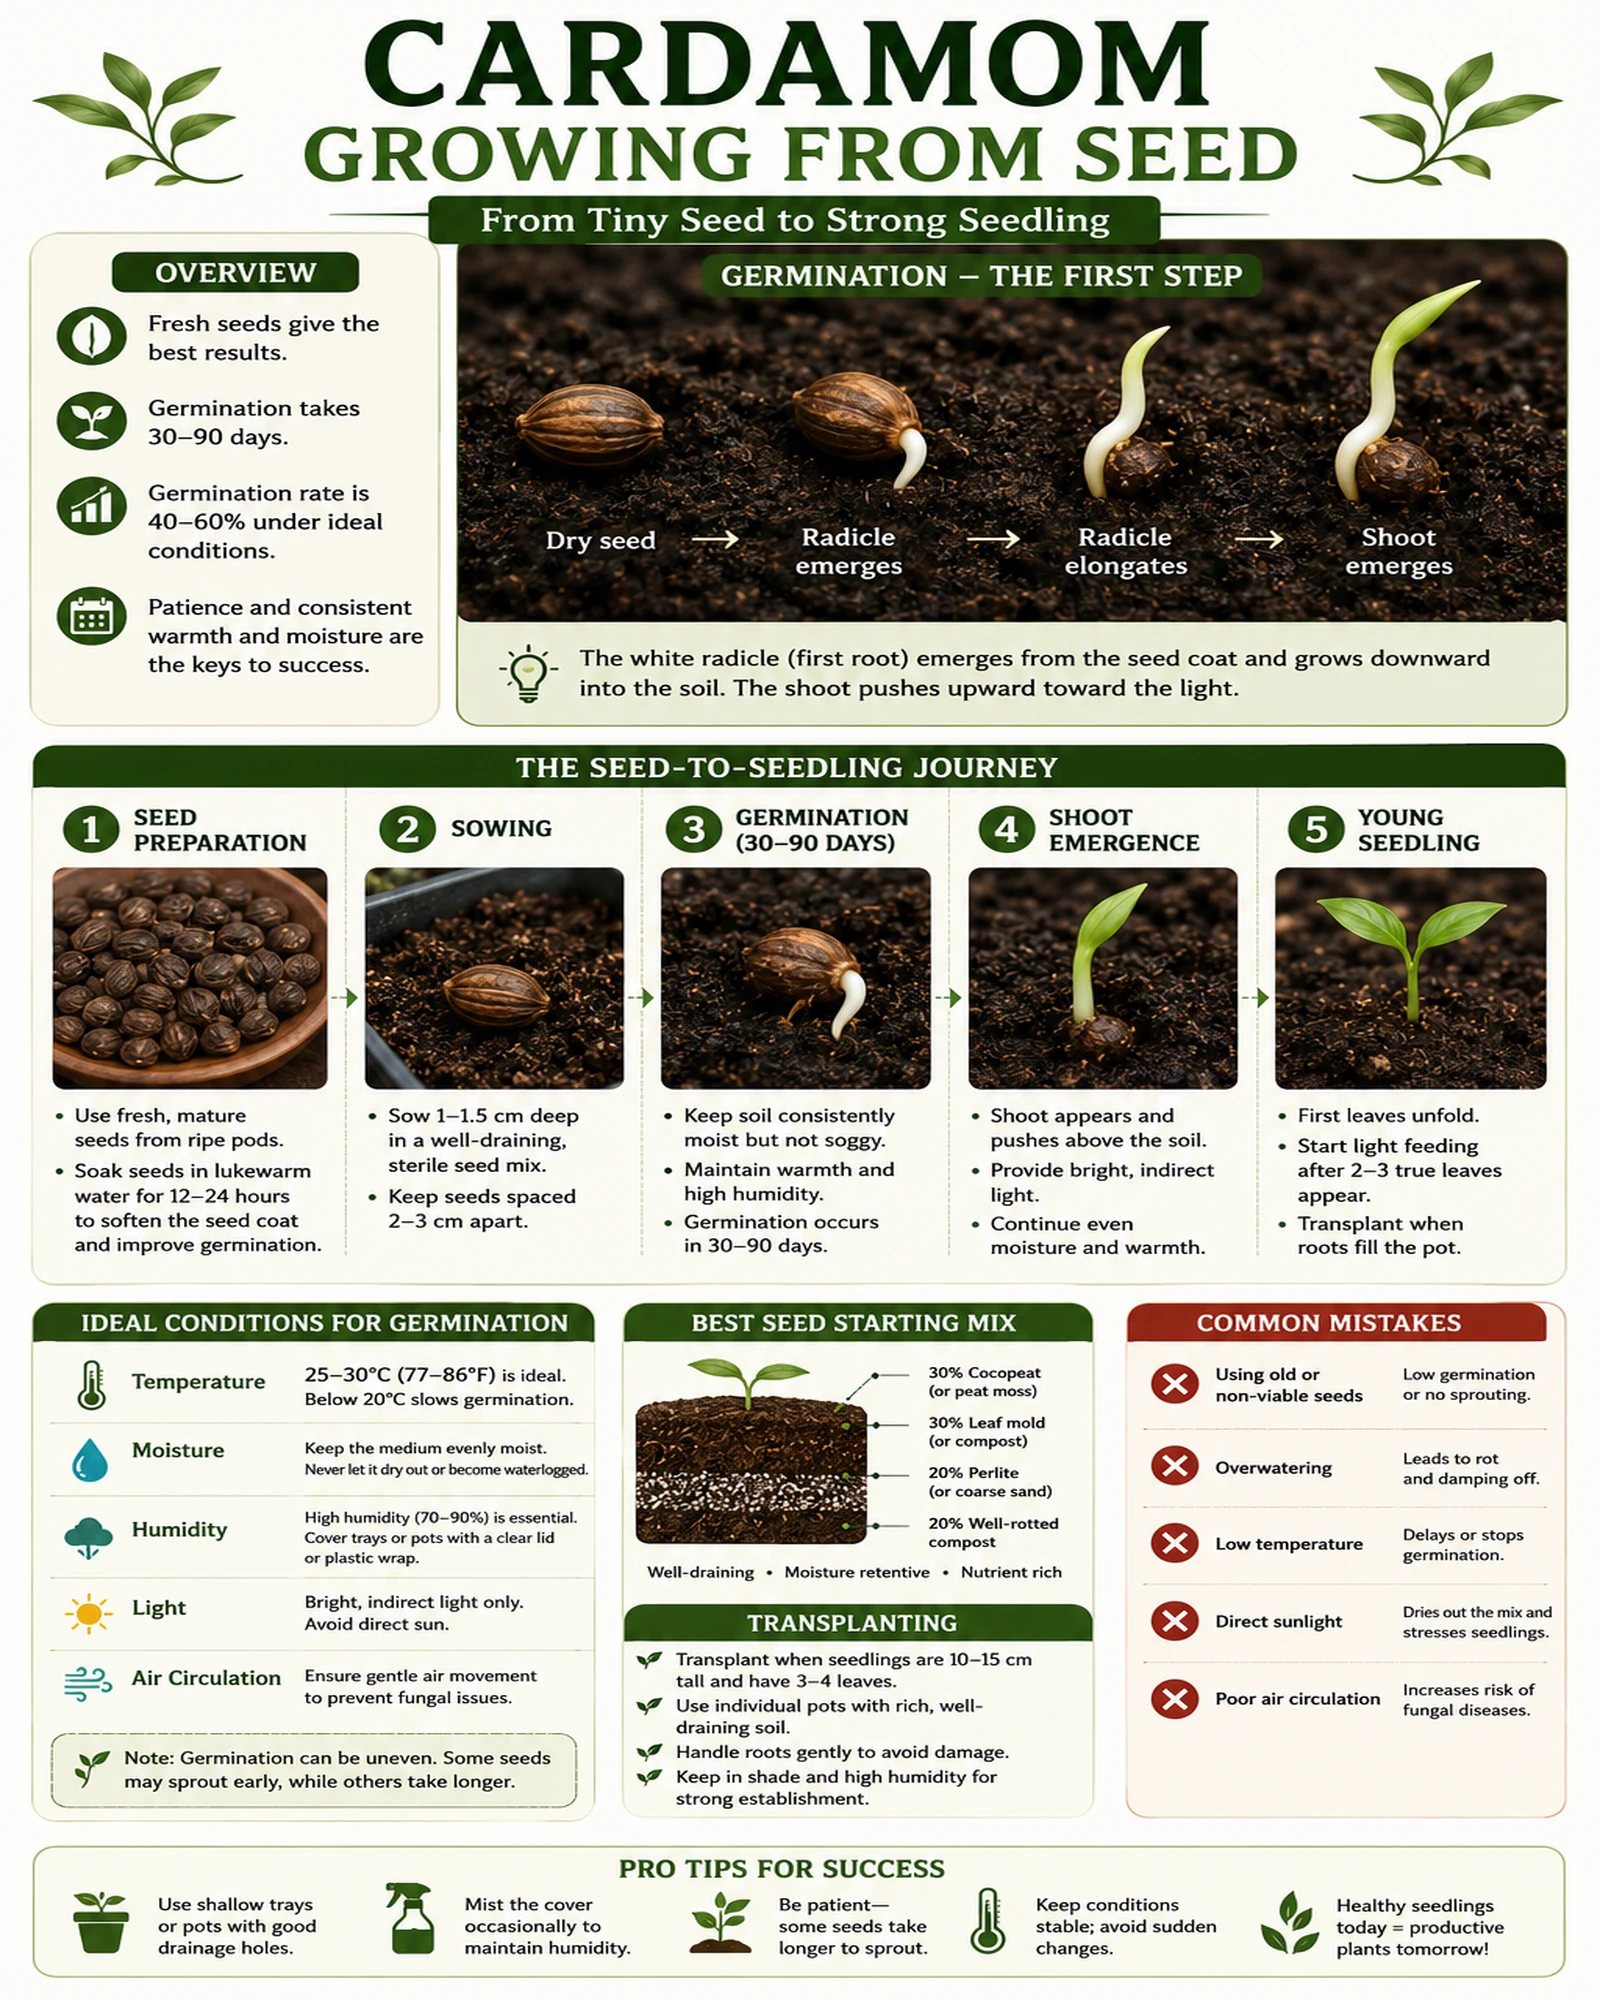
Cardamom Seed Germination — Close-up
The white radicle (primary root tip) emerges from the seed coat 3–8 weeks after sowing under ideal conditions (25–30°C, high humidity). Seeds must be fresh — dried or bleached store-bought seeds have only 10–30% viability versus 60–80% for fresh specialist seeds.
 Seedlings
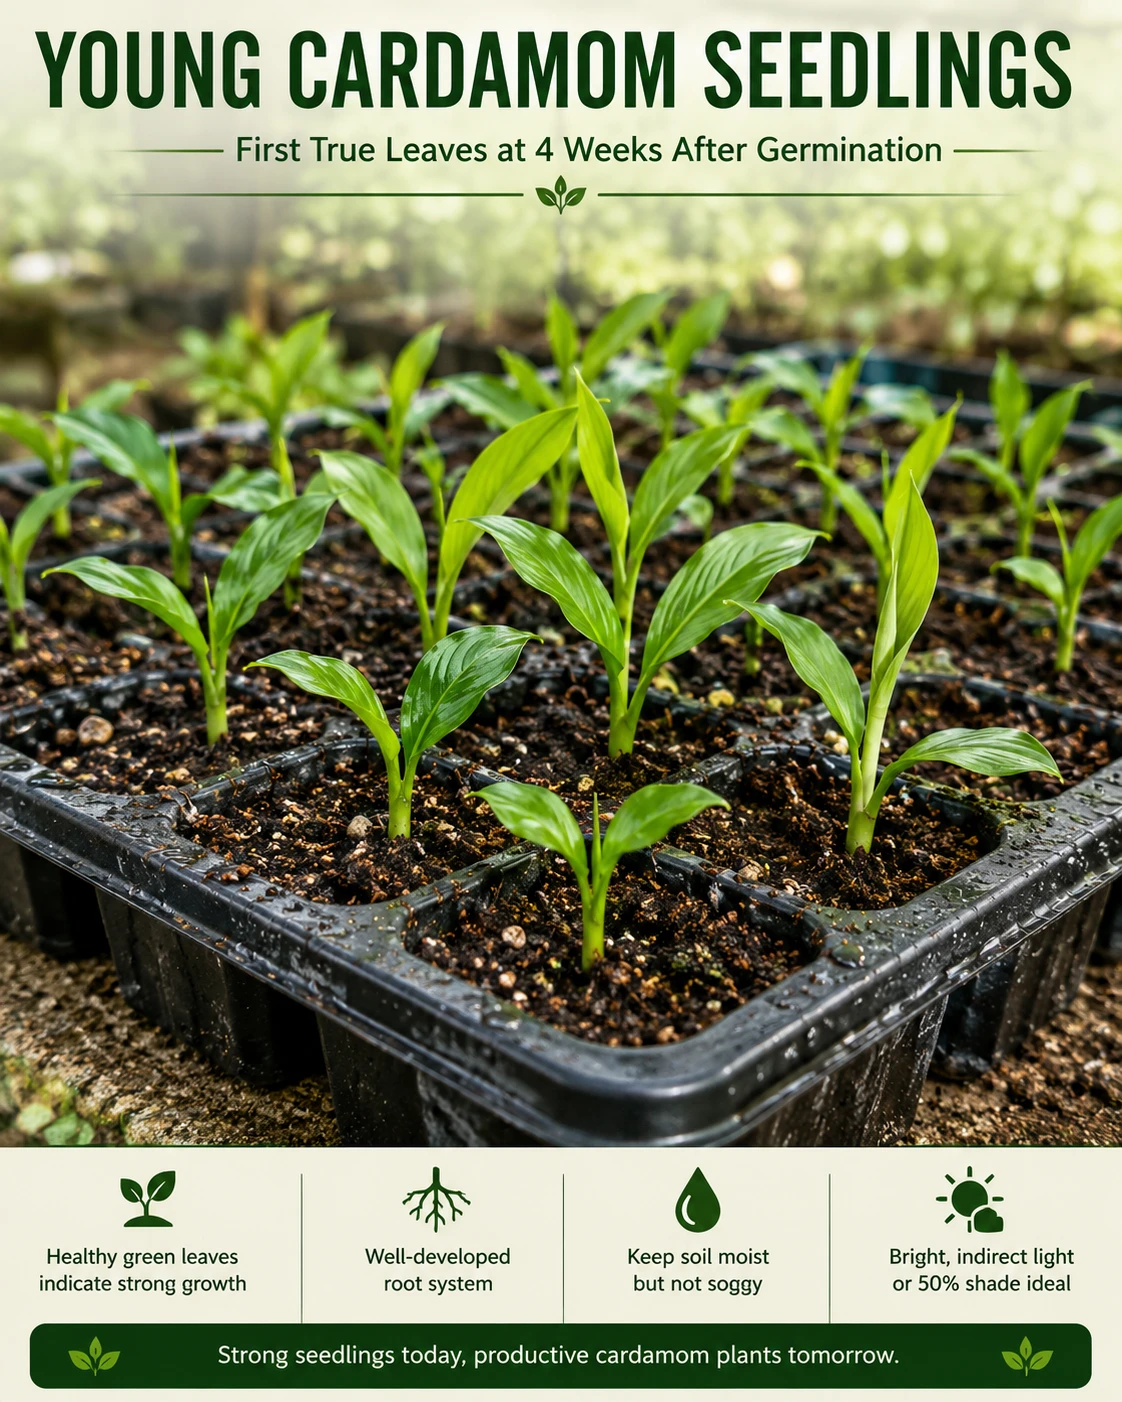
Young Cardamom Seedlings — 4 Weeks
First true leaves emerging at approximately 4 weeks from germination in a nursery tray. At this stage, seedlings have developed enough root mass to be carefully potted on into individual 10cm pots using free-draining growing mix. Handle roots gently — tap roots are fragile at this stage.
 Flowering
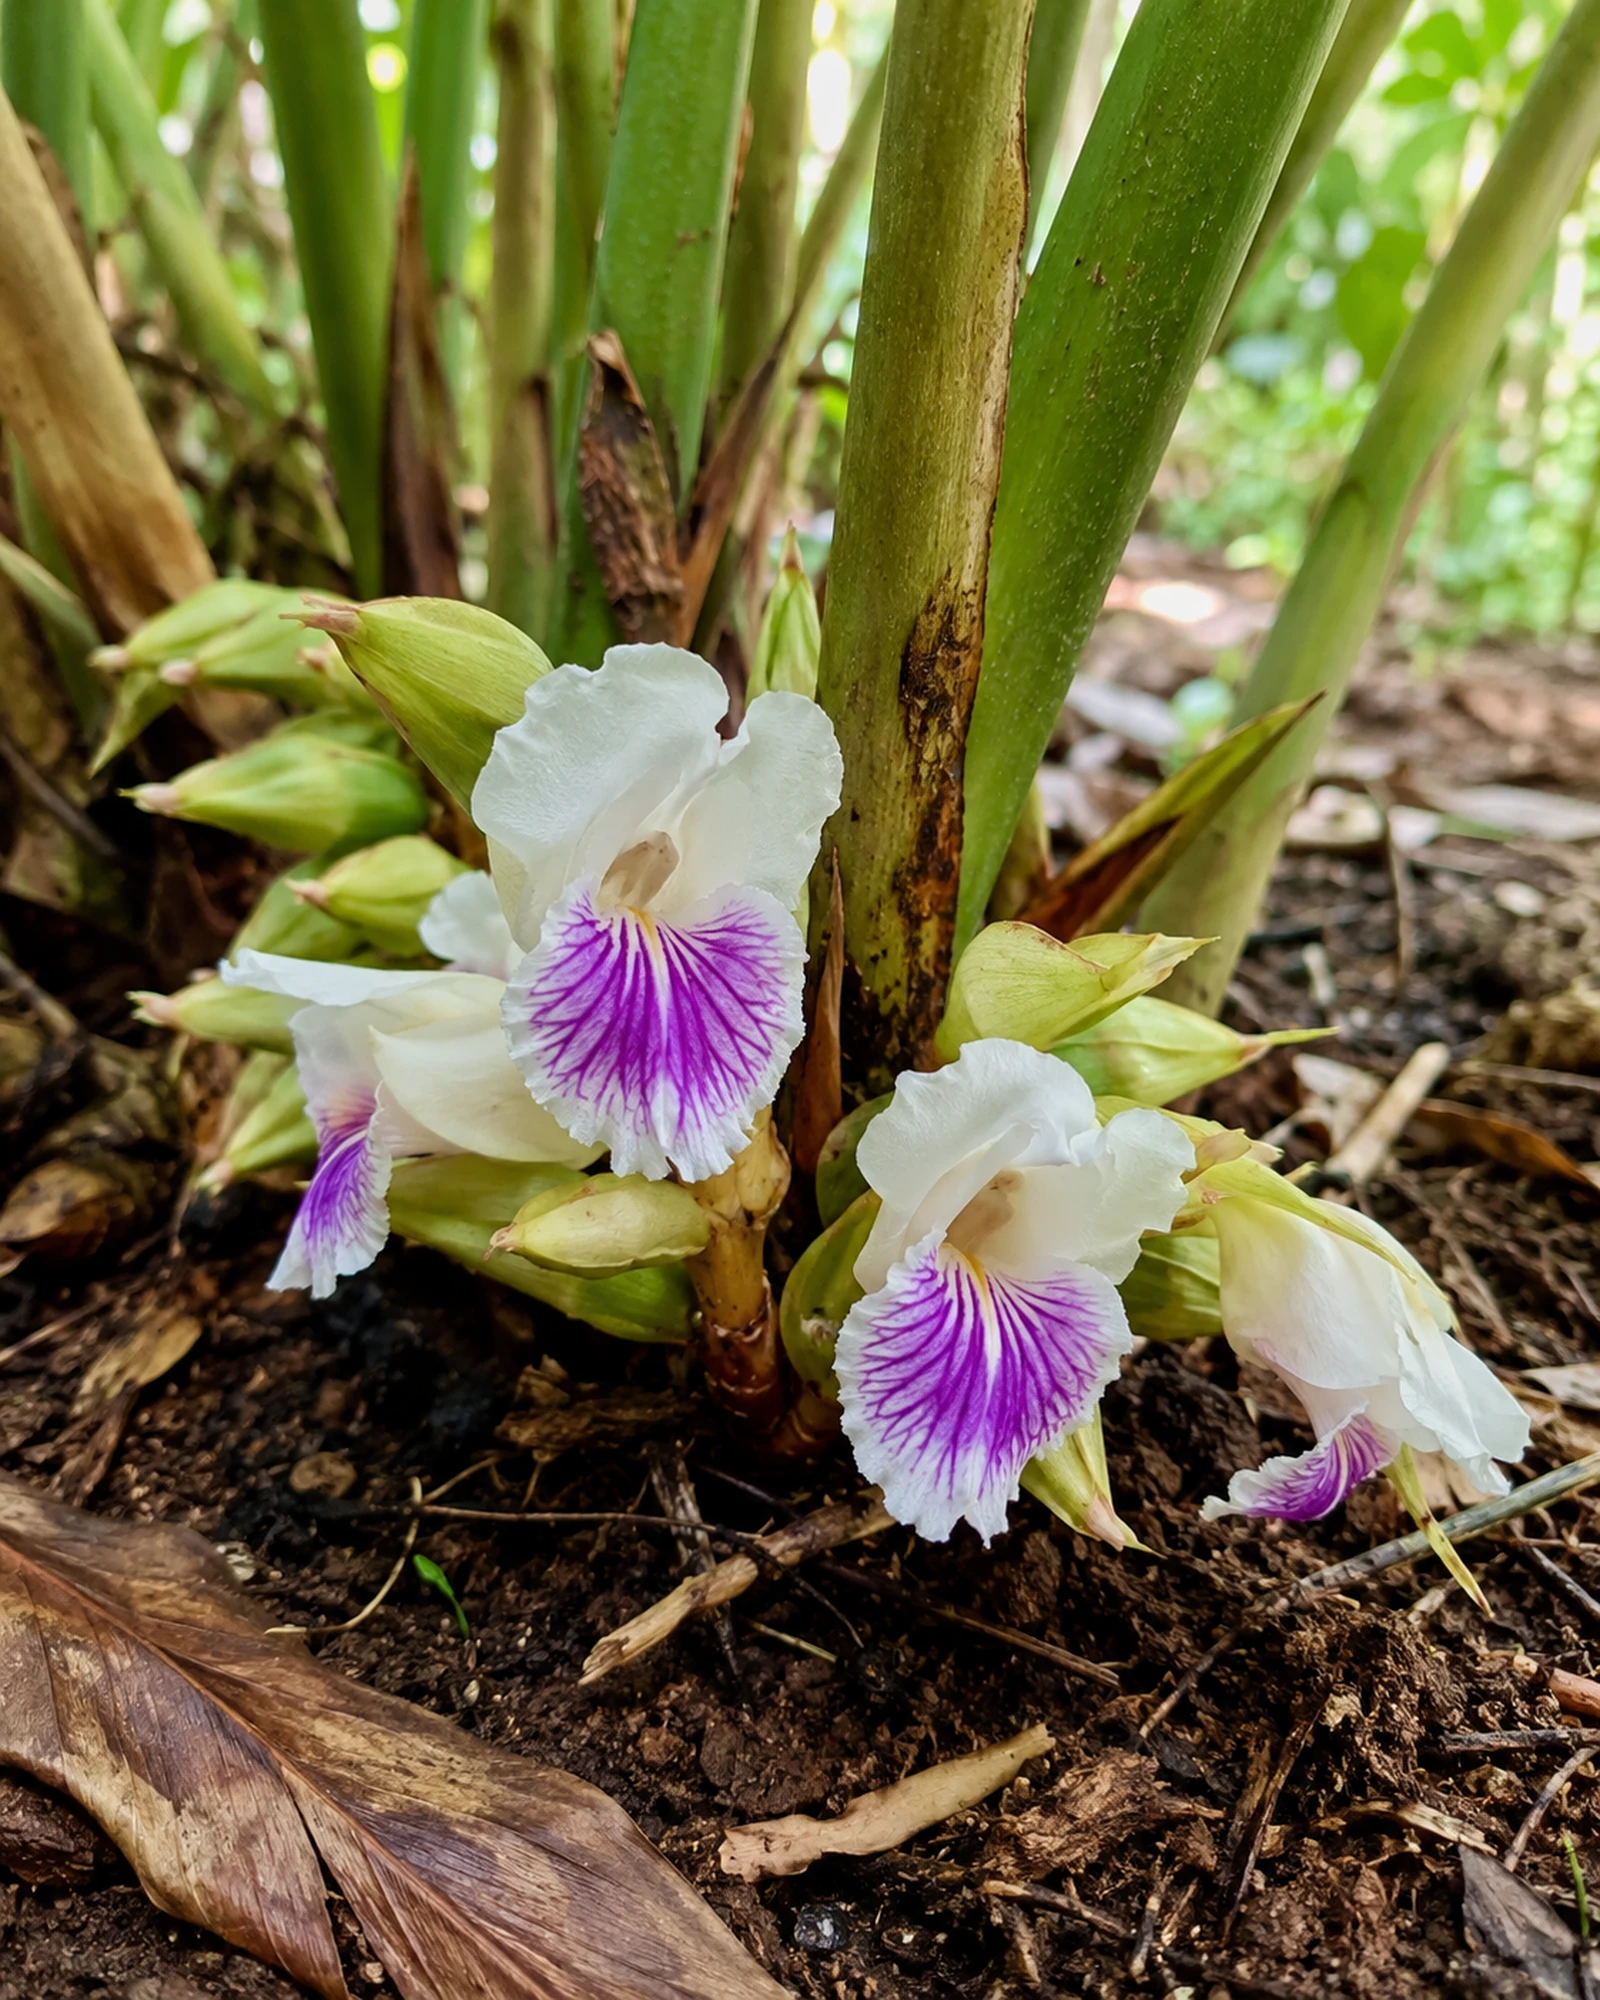
Cardamom Flower — White with Violet Stripes
The iconic Elettaria cardamomum flower — white petals with distinctive purple/violet striped labellum (lip), growing on horizontal racemes at soil level. Each flower opens for only 1–2 days, so monitor closely during flowering season. Pollination can be assisted with a soft brush if growing indoors without pollinators.
 Pods
Pods
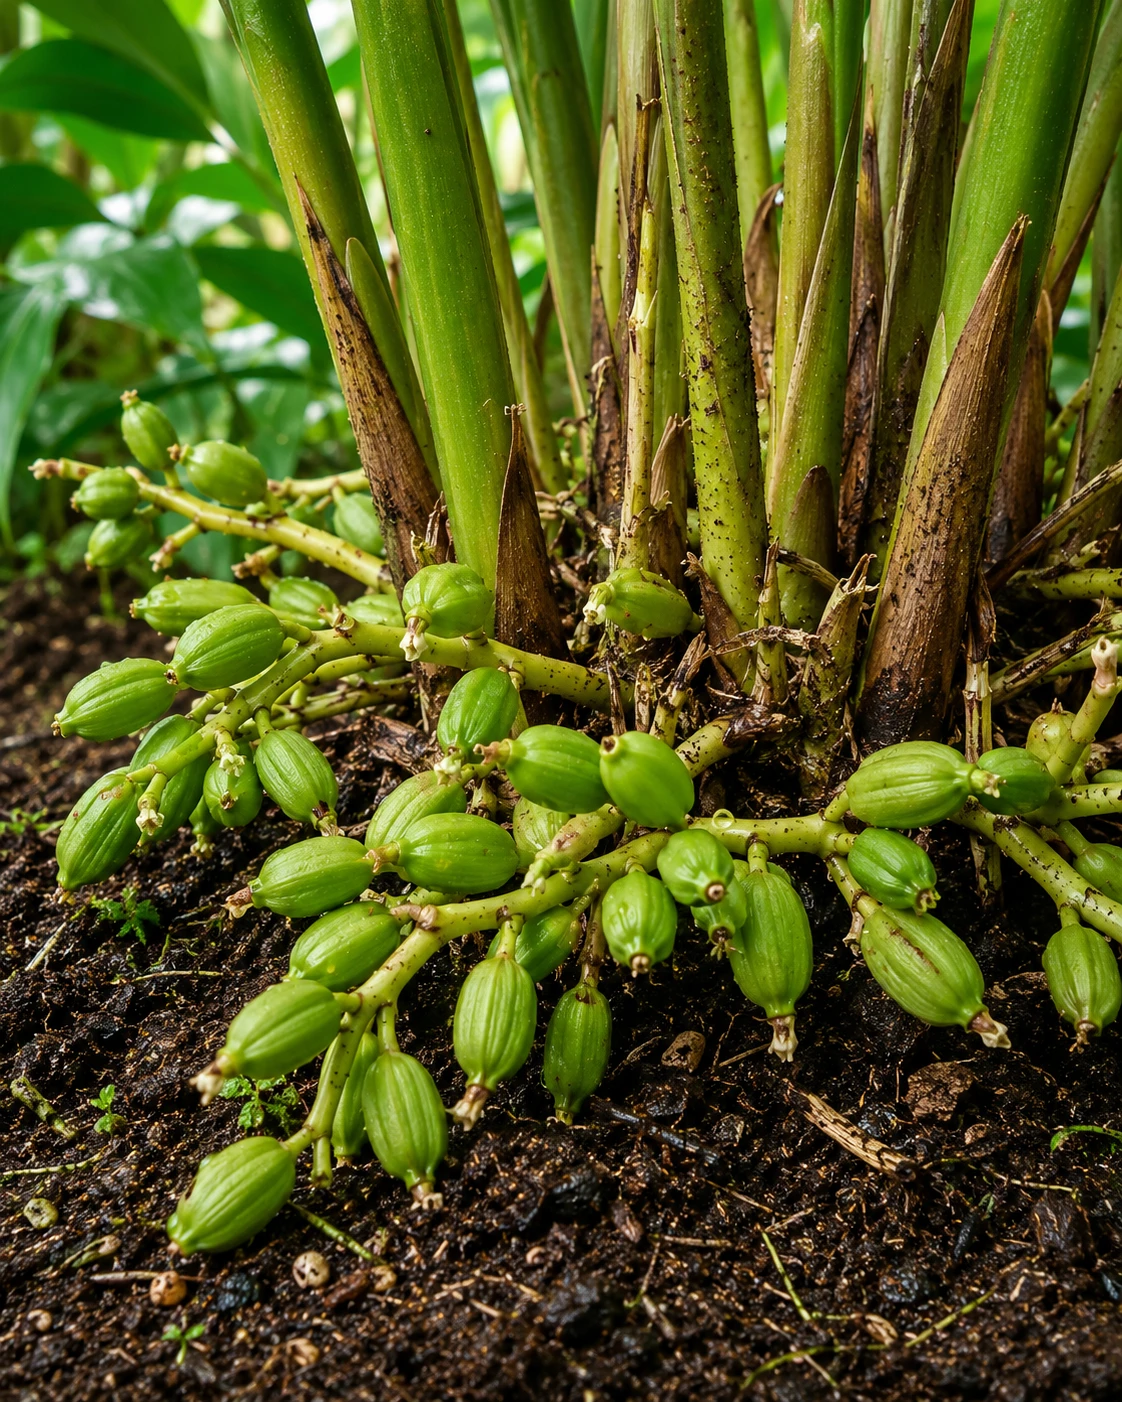
Green Cardamom Pods — Ready to Harvest
Plump, firm, bright-green pods clustered on a horizontal raceme at the base of the plant. These pods are at the ideal harvest stage — 35–40 days after flowering, before any yellowing begins. The complete raceme here shows pods at different stages of development, which is normal — harvest the plump ones and allow smaller pods to continue developing.
Cardamom Growing Conditions — What This Plant Actually Needs
Temperature, humidity, light, altitude — the non-negotiable requirementsCardamom growing conditions at a glance: Temperature 18–35°C (64–95°F), humidity above 70%, 50–75% shade (no direct midday sun), well-draining loamy soil at pH 6.0–6.8, rainfall or equivalent watering of 1500–4000mm per year. Cannot tolerate frost, waterlogging, or prolonged drought.
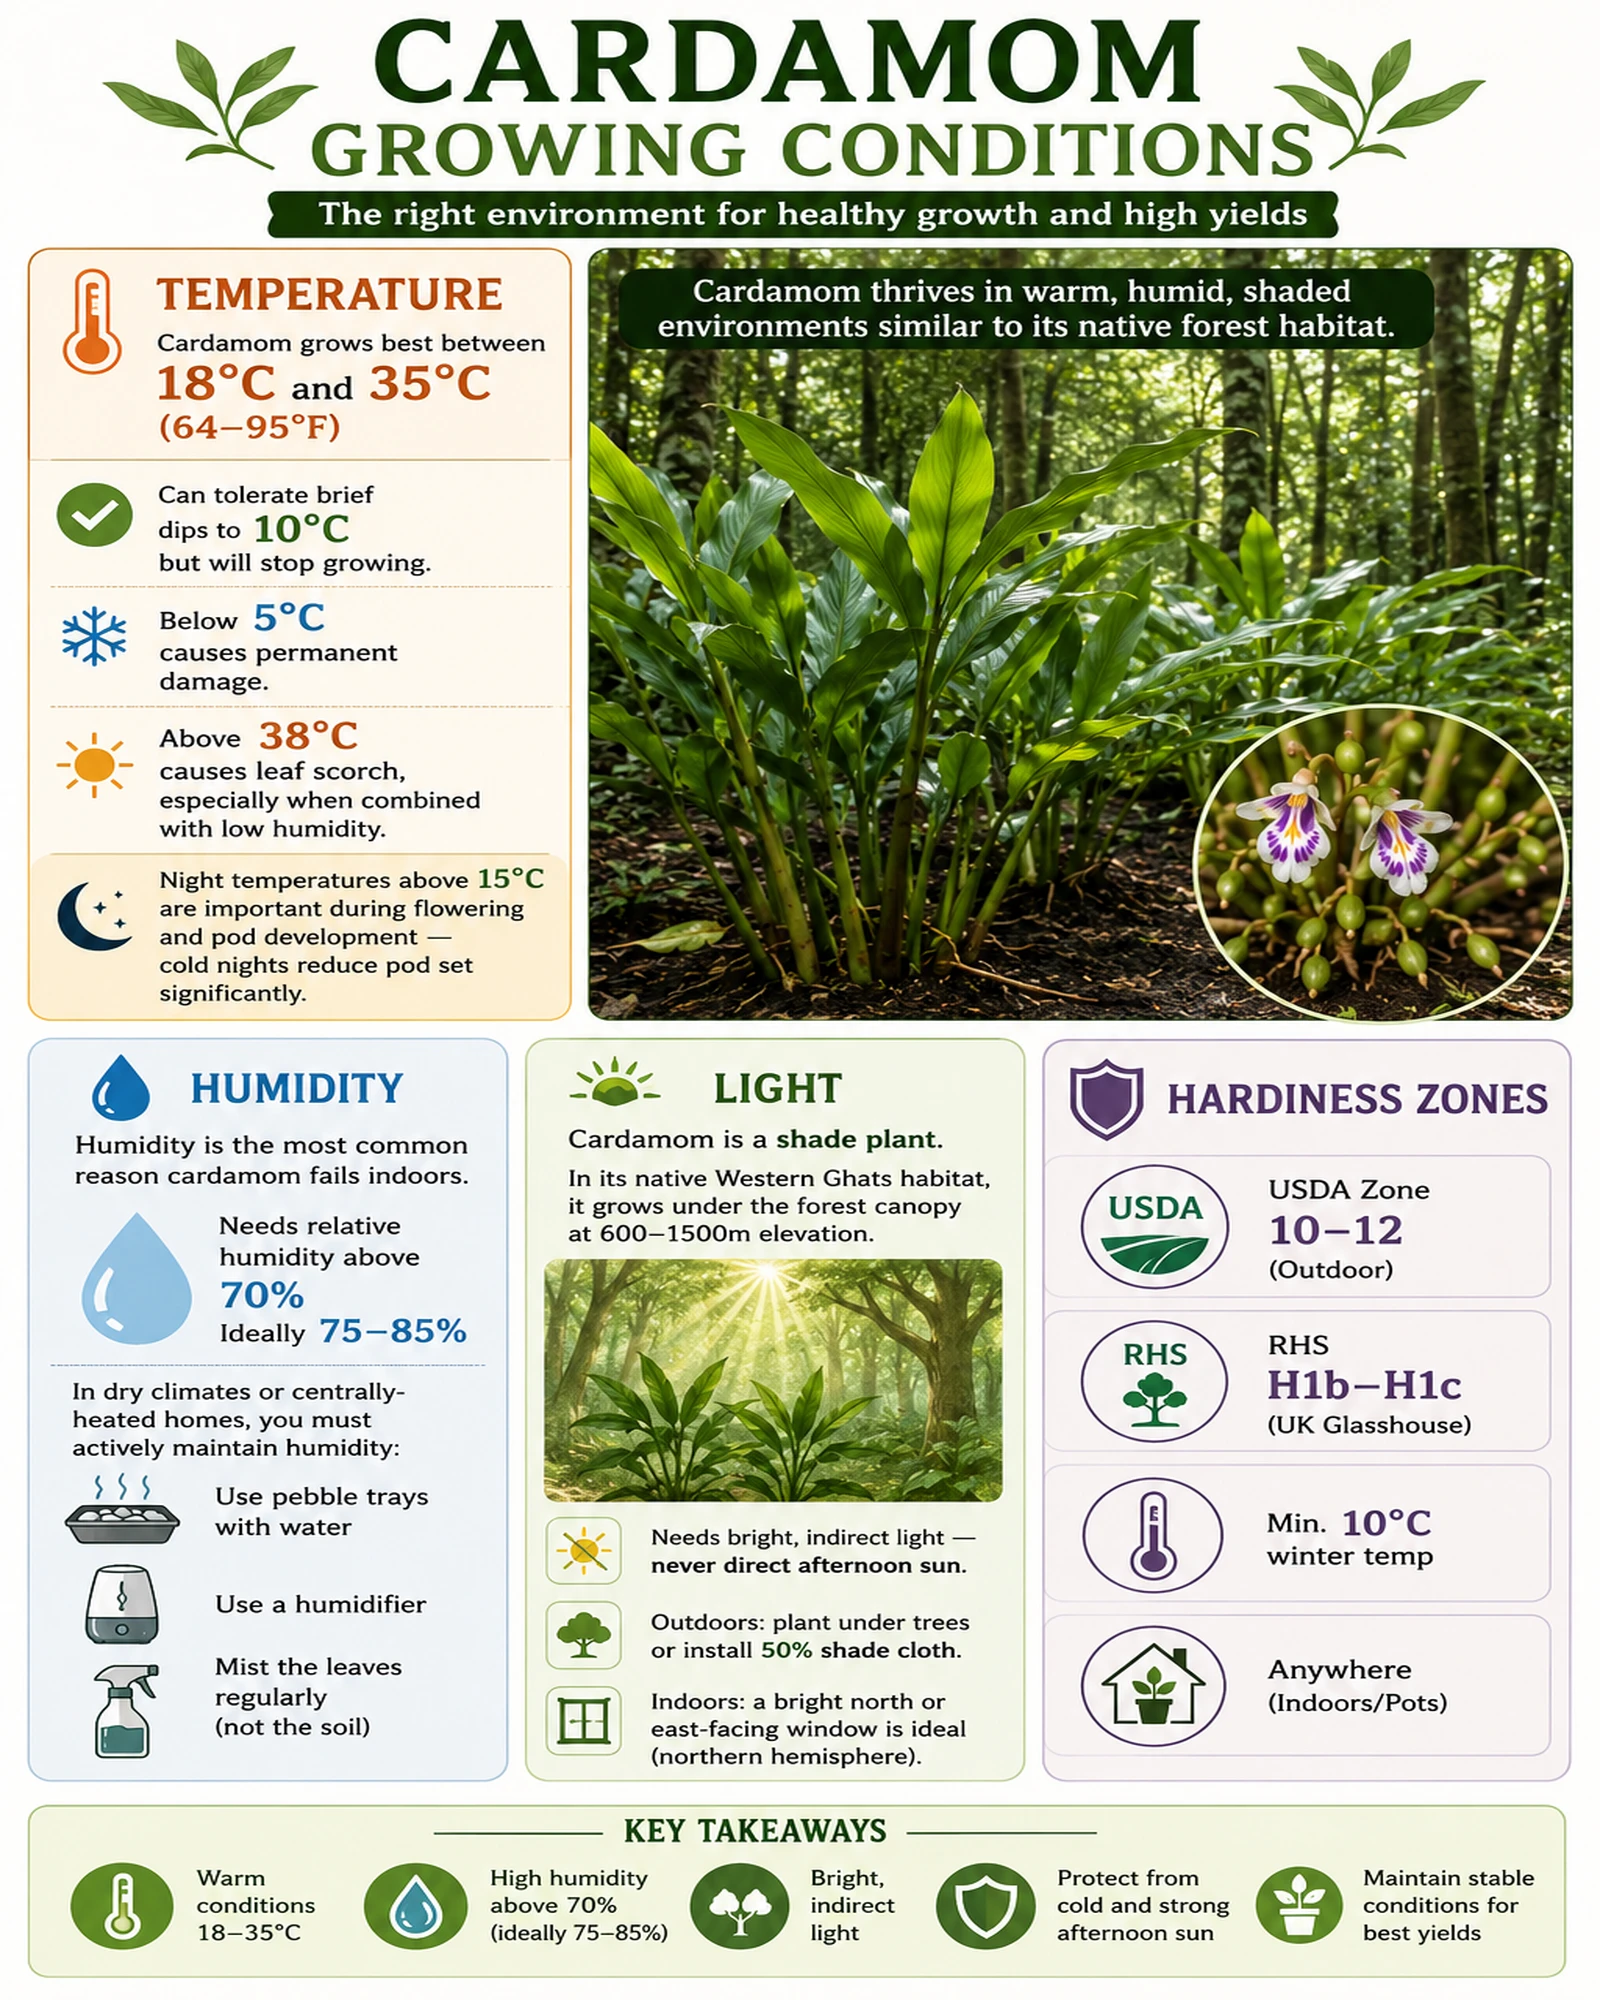
Temperature
Cardamom grows best between 18°C and 35°C (64–95°F). It can tolerate brief dips to 10°C but will stop growing. Below 5°C causes permanent damage. Above 38°C causes leaf scorch, especially when combined with low humidity.
Night temperatures above 15°C are important during flowering and pod development — cold nights reduce pod set significantly.
Humidity
Humidity is the most common reason cardamom fails indoors. The plant needs relative humidity above 70%, ideally 75–85%. In dry climates or centrally-heated homes, you must actively maintain humidity using pebble trays, a humidifier, or regular misting of the leaves (not the soil).
Light
Cardamom is a shade plant. In its native Western Ghats habitat, it grows under the forest canopy at 600–1500m elevation. It needs bright, indirect light — never direct afternoon sun. Outdoors, plant under trees or install 50% shade cloth. Indoors, a bright north or east-facing window is ideal in the northern hemisphere.
Hardiness Zones
Climate Suitability by Region
| Climate / Region | Suitability | Method | Key Challenge |
|---|---|---|---|
| Southern India, Sri Lanka | ★★★★★ Ideal | Outdoor plantation | None — native climate |
| Florida, Hawaii, Puerto Rico | ★★★★★ Excellent | Outdoor garden | Hurricane / wind damage |
| Queensland, NSW Australia | ★★★★ Very Good | Outdoor or pots | Summer heat peaks |
| California, Texas, Georgia (USA) | ★★★ Good | Pots or sheltered garden | Winter cold, dry summers |
| Mediterranean Europe | ★★★ Good | Pots — bring inside in winter | Summer drought, dry heat |
| UK, Northern Europe | ★★ Possible | Heated greenhouse or indoors | Low humidity, cold winters |
| Canada, Northern USA | ★ Difficult | Indoors only | Dry indoor air, low light |
How to Grow Cardamom — Seeds vs Rhizome Divisions
Choosing your propagation method and how to do it correctlyMethod 1: Growing Cardamom from Seed
Growing cardamom from seed is slow but satisfying. Fresh seeds have a 60–80% germination rate; dried or shop-bought seeds drop to 10–30%. Always use seeds from a specialist supplier or extract them from fresh pods yourself.
Scarify and soak seeds
Lightly rub seeds on fine sandpaper to break the seed coat. Soak in warm water (30°C) for 24 hours. Discard any seeds that float — they are not viable.
Prepare seed compost
Mix 50% coco peat, 30% perlite, 20% vermiculite. Fill small pots or seed trays. Keep consistently moist but not waterlogged. Temperature must stay above 25°C for germination.
Sow 1cm deep
Sow each seed 1cm deep. Cover with compost. Cover the pot with a clear plastic bag or propagator lid to maintain humidity. Place in a warm spot (25–30°C) — a heat mat helps significantly.
Wait 3–8 weeks for germination
Germination is slow. Keep soil moist but do not over-water. Remove the cover briefly each day for airflow. First shoots appear in 3–8 weeks depending on temperature.
Pot up at 10cm height
Once seedlings reach 10cm with two true leaves, pot into 10cm pots using the growing mix described in the soil section below. Increase pot size as plants grow.
→ Complete Guide: Grow Cardamom from Seed →
Method 2: Growing Cardamom from Rhizome Divisions
Rhizome division is the faster, more reliable method. Divide an established plant in spring when new shoots are emerging. Each division must have at least one healthy growing tip and a section of healthy rhizome.
Plant rhizome divisions 2–3cm deep with the growing tip just above or at soil level. Keep in shade and maintain high humidity for the first 4–6 weeks while roots establish. Success rate with healthy rhizomes: 85–95%.
→ Complete Guide: Grow Cardamom from Rhizome →
Can You Grow Cardamom from Store-Bought Pods?
Sometimes — but results are unreliable. Store-bought green cardamom pods are often bleached or dried, reducing seed viability. For best results: buy fresh, unprocessed pods from a specialist spice supplier. Open the pods, extract the seeds, and sow immediately. Do not use ground cardamom — only whole seeds.
Growing Cardamom by Location — UK, USA, India, Australia
Country-specific guides — climate adjustments, best varieties, and local tipsCardamom can be grown in nearly every country — but the method differs dramatically by climate. Select your location for a complete specialist guide.
 🇬🇧 United Kingdom
Grow Cardamom in the UK
Heated greenhouse or warm conservatory required. Maintain 15°C minimum in winter. High demand — ranked position 1 for “can you grow cardamom in the uk”.
Full UK Guide → 🇺🇸 United States
Growing Cardamom in USA
Outdoor success in USDA zones 10–12 (Florida, Hawaii, Gulf Coast). Zones 7–9: pots moved indoors in winter. Our top-performing page — 14 clicks, position 4.9.
Full USA Guide → 🇮🇳 India
Grow Cardamom in India
Native climate — ideal conditions in Kerala, Karnataka, and Tamil Nadu. Home gardeners across India can grow in pots or garden beds with minimal intervention.
Full India Guide → 🇦🇺 Australia
Grow Cardamom in Australia
Excellent conditions in QLD, northern NSW, and NT. Southern states: pots and glasshouse growing. Hardy once established in subtropical zones.
Full Australia Guide →Growing Cardamom Indoors — The Complete Method
How to grow cardamom as a houseplant successfully in any climateCan you grow cardamom indoors? Yes — cardamom makes an excellent, long-lived houseplant. It thrives in a warm room (minimum 15°C year-round) with bright indirect light, high humidity, and consistent watering. It will not flower indoors as readily as outdoors, but it remains a striking foliage plant. With sufficient warmth and care, indoor plants do produce pods.
Ideal Indoor Setup
- Location: Bright, east or north-facing window. No direct midday sun through glass — it scorches leaves.
- Temperature: 18–28°C daytime, minimum 15°C at night. Keep away from cold draughts and radiators.
- Humidity: Use a pebble tray filled with water beneath the pot. Mist leaves 2–3 times per week. A small humidifier running nearby is ideal.
- Pot size: Start in 15cm pots, repot every 2–3 years into a pot 5–7cm wider. Cardamom rhizomes need room to spread.
- Soil: Free-draining mix — see soil section below for the exact recipe.
Indoor Flowering Tip
Indoor cardamom plants flower more readily if you move them outdoors during summer (shade only). The change in temperature, humidity, and natural light cycles triggers flowering. Bring back inside before temperatures drop below 12°C.
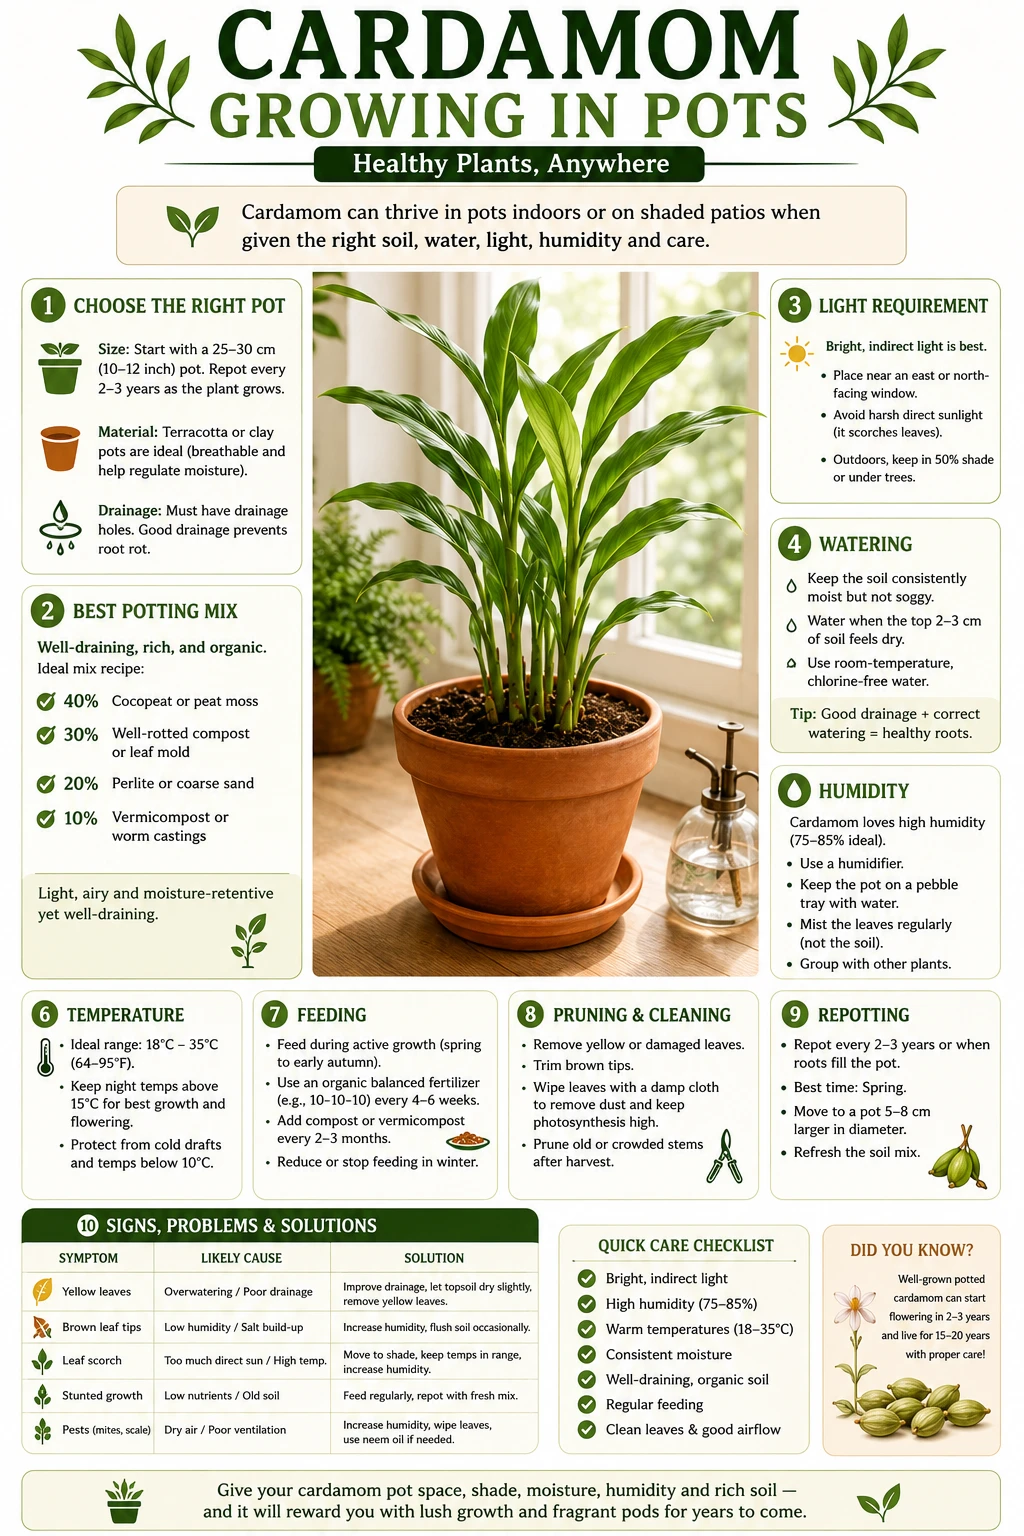
Growing Cardamom in Pots — Container Growing Guide
Pot size, drainage, repotting cycle, and container varietiesGrowing cardamom in pots gives you full control over soil quality, placement, and winter protection. The key to pot success is choosing a container that accommodates the spreading rhizome and ensuring excellent drainage — waterlogging is the most common cause of pot-grown cardamom failure.
Pot Selection
Choose a pot that is at least 30–40cm wide and 35–40cm deep. Terracotta is excellent as it is breathable and helps regulate soil moisture. Plastic pots retain moisture longer — useful in dry climates but risky in wet ones. Always ensure multiple drainage holes in the base.
Repotting
Repot every 2–3 years in spring when you see roots emerging from the drainage holes or the plant appears root-bound. At repotting, divide the rhizome if you want to propagate — each section with a growing tip will develop into a new plant.
Container Growing — Visual Guide
Click any image to open in full 1600×2000 resolution and zoom in on detail.
Indoor Pot
Cardamom in a Terracotta Pot — Indoor Setup
A healthy, established cardamom plant in a 30cm terracotta pot positioned near a bright east-facing window. The terracotta material is ideal — it breathes, prevents waterlogging, and naturally regulates temperature. The pebble humidity tray visible beneath the pot is essential for indoor growing where ambient humidity rarely reaches the required 70%.
 Soil Mix
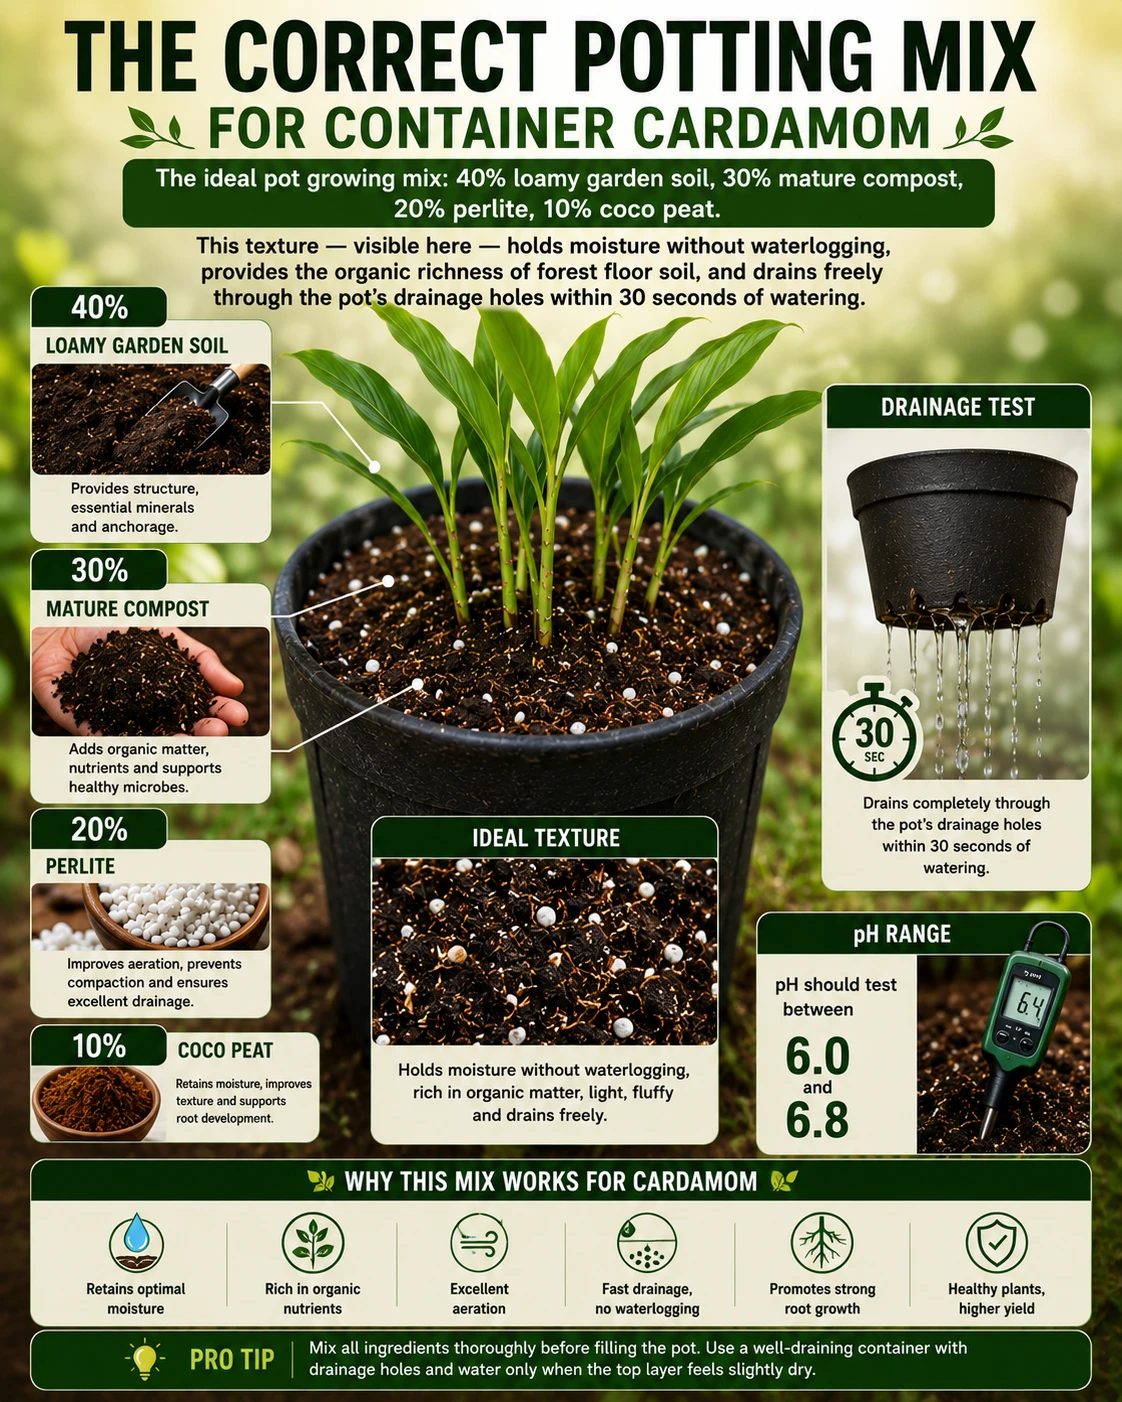
The Correct Potting Mix for Container Cardamom
The ideal pot growing mix: 40% loamy garden soil, 30% mature compost, 20% perlite, 10% coco peat. This texture — visible here — holds moisture without waterlogging, provides the organic richness of forest floor soil, and drains freely through the pot’s drainage holes within 30 seconds of watering. pH should test between 6.0 and 6.8.
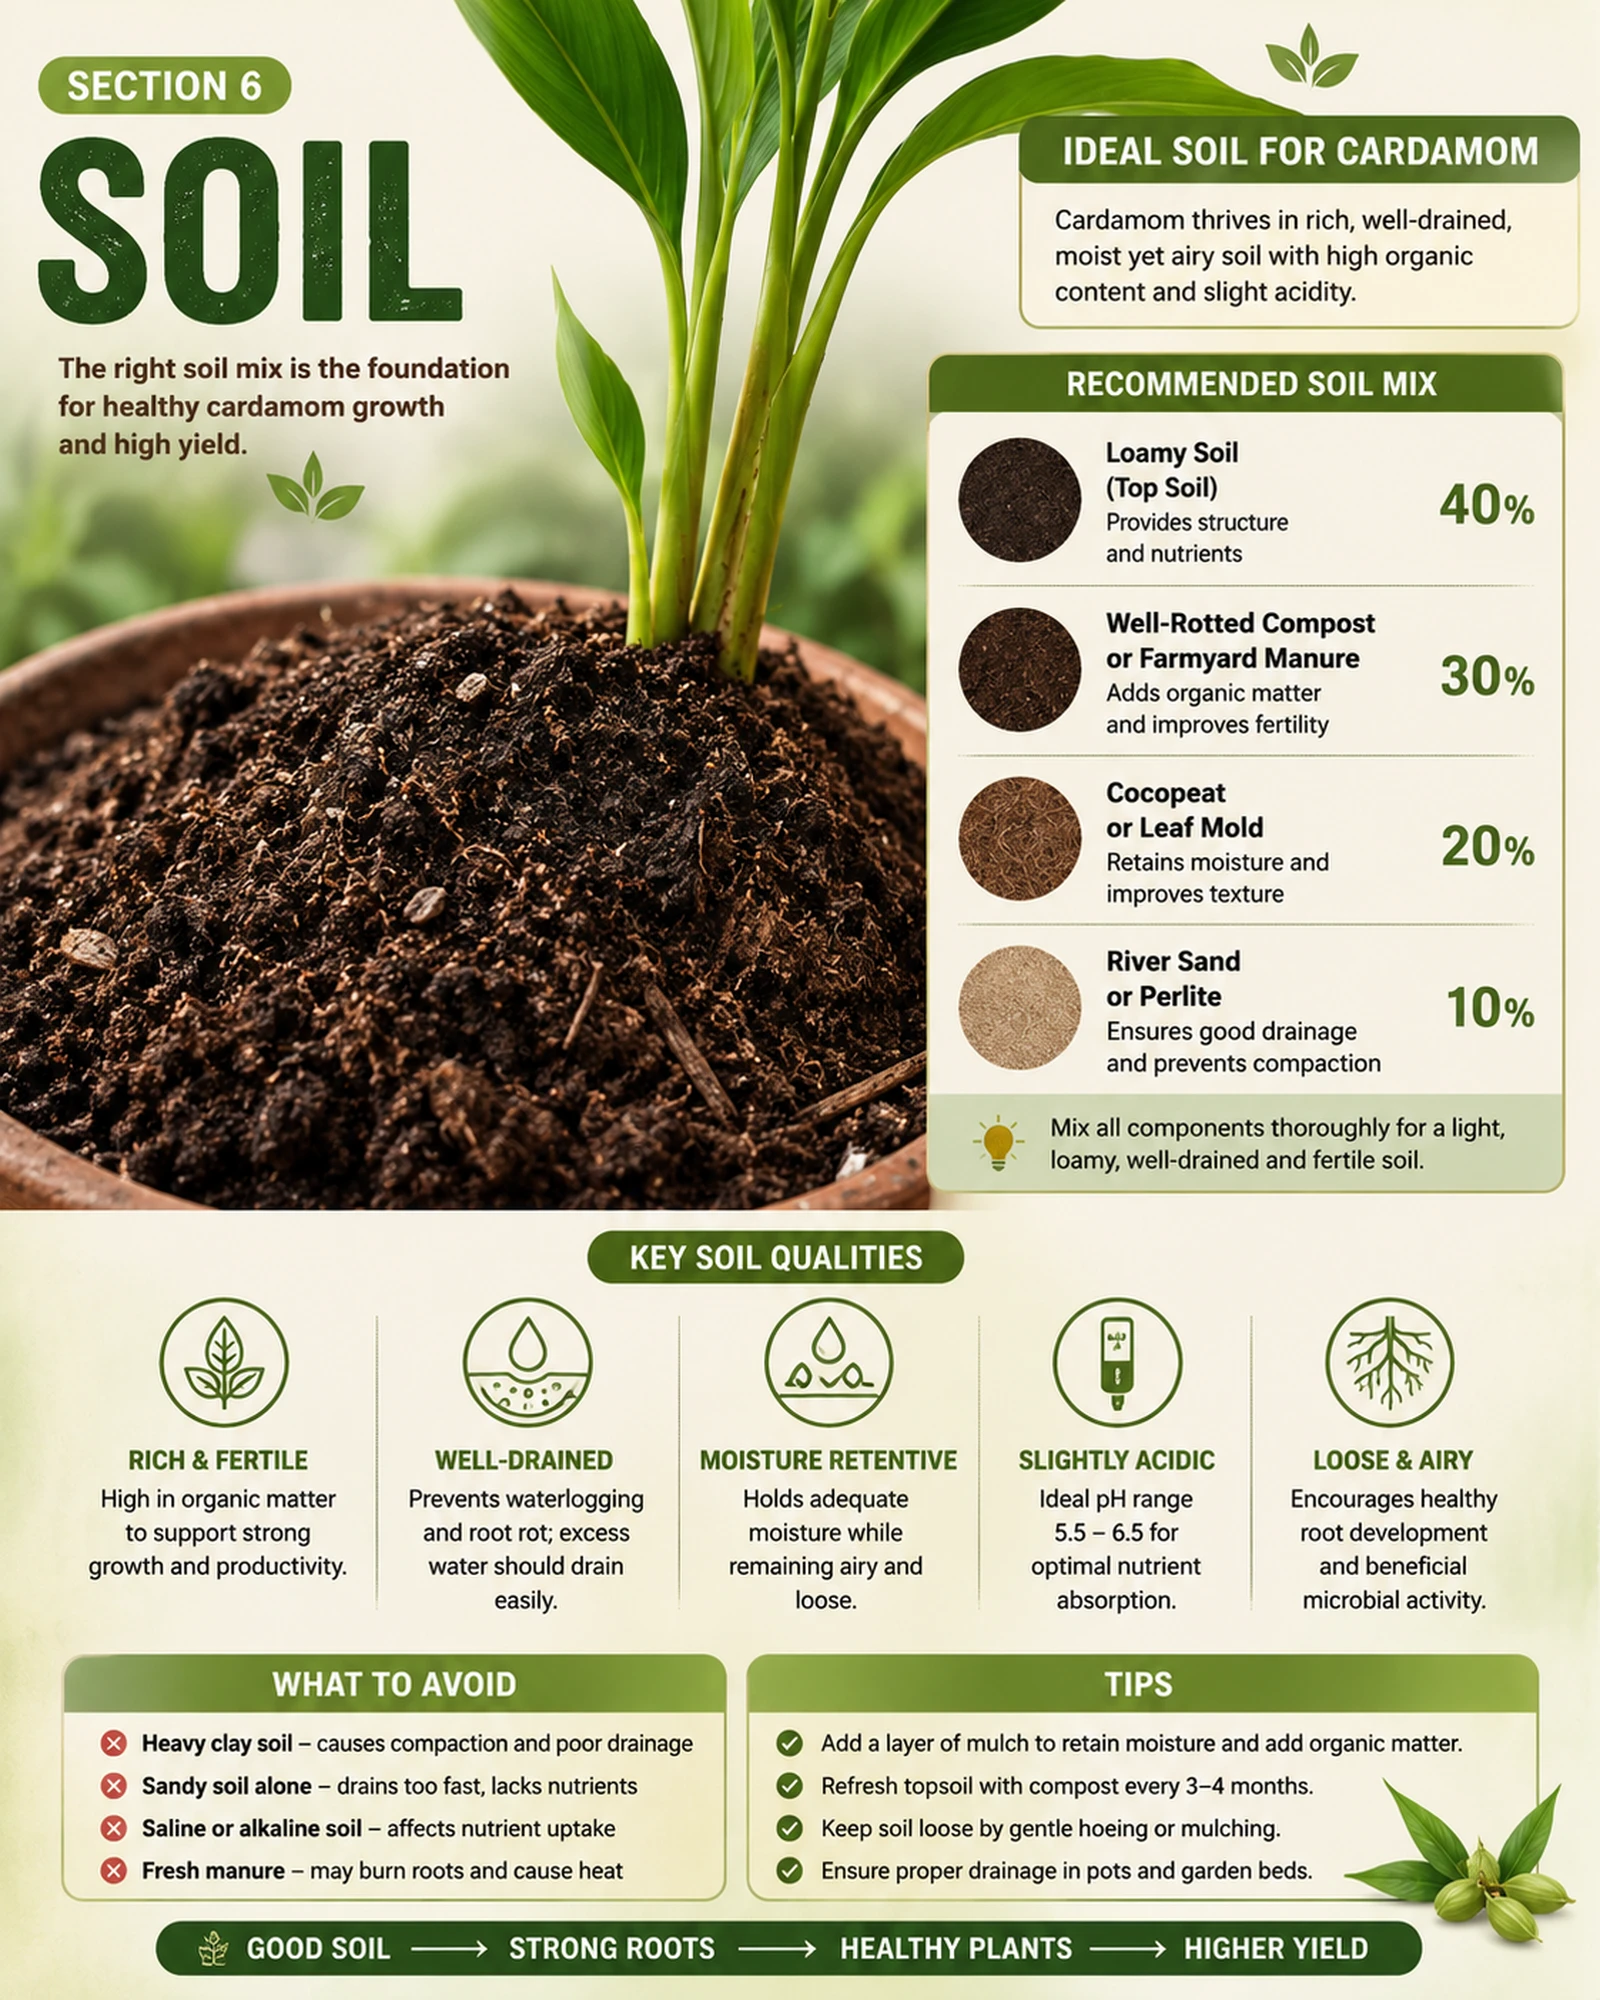
Best Soil for Cardamom — Mix, pH, and Drainage
The exact soil recipe that gives cardamom the foundation it needsBest soil for cardamom: Well-draining loamy soil rich in organic matter at pH 6.0–6.8. Mix: 40% garden soil, 30% compost, 20% perlite, 10% coco peat. This replicates the forest floor conditions of cardamom’s native Western Ghats habitat.
Soil Mix Recipe
| Component | Ratio | Purpose |
|---|---|---|
| Garden soil / loam | 40% | Base structure, minerals |
| Mature compost | 30% | Organic matter, nutrients, microbes |
| Perlite | 20% | Drainage, aeration, prevent compaction |
| Coco peat | 10% | Moisture retention, pH buffer |
What to Avoid
- Heavy clay soils: Cause waterlogging and root rot — the most common cause of cardamom plant death
- Sandy soils: Drain too fast, unable to retain moisture or nutrients long enough
- Acidic pH below 5.5: Prevents nutrient uptake, causes leaf yellowing
- Alkaline pH above 7.5: Induces iron and manganese deficiency
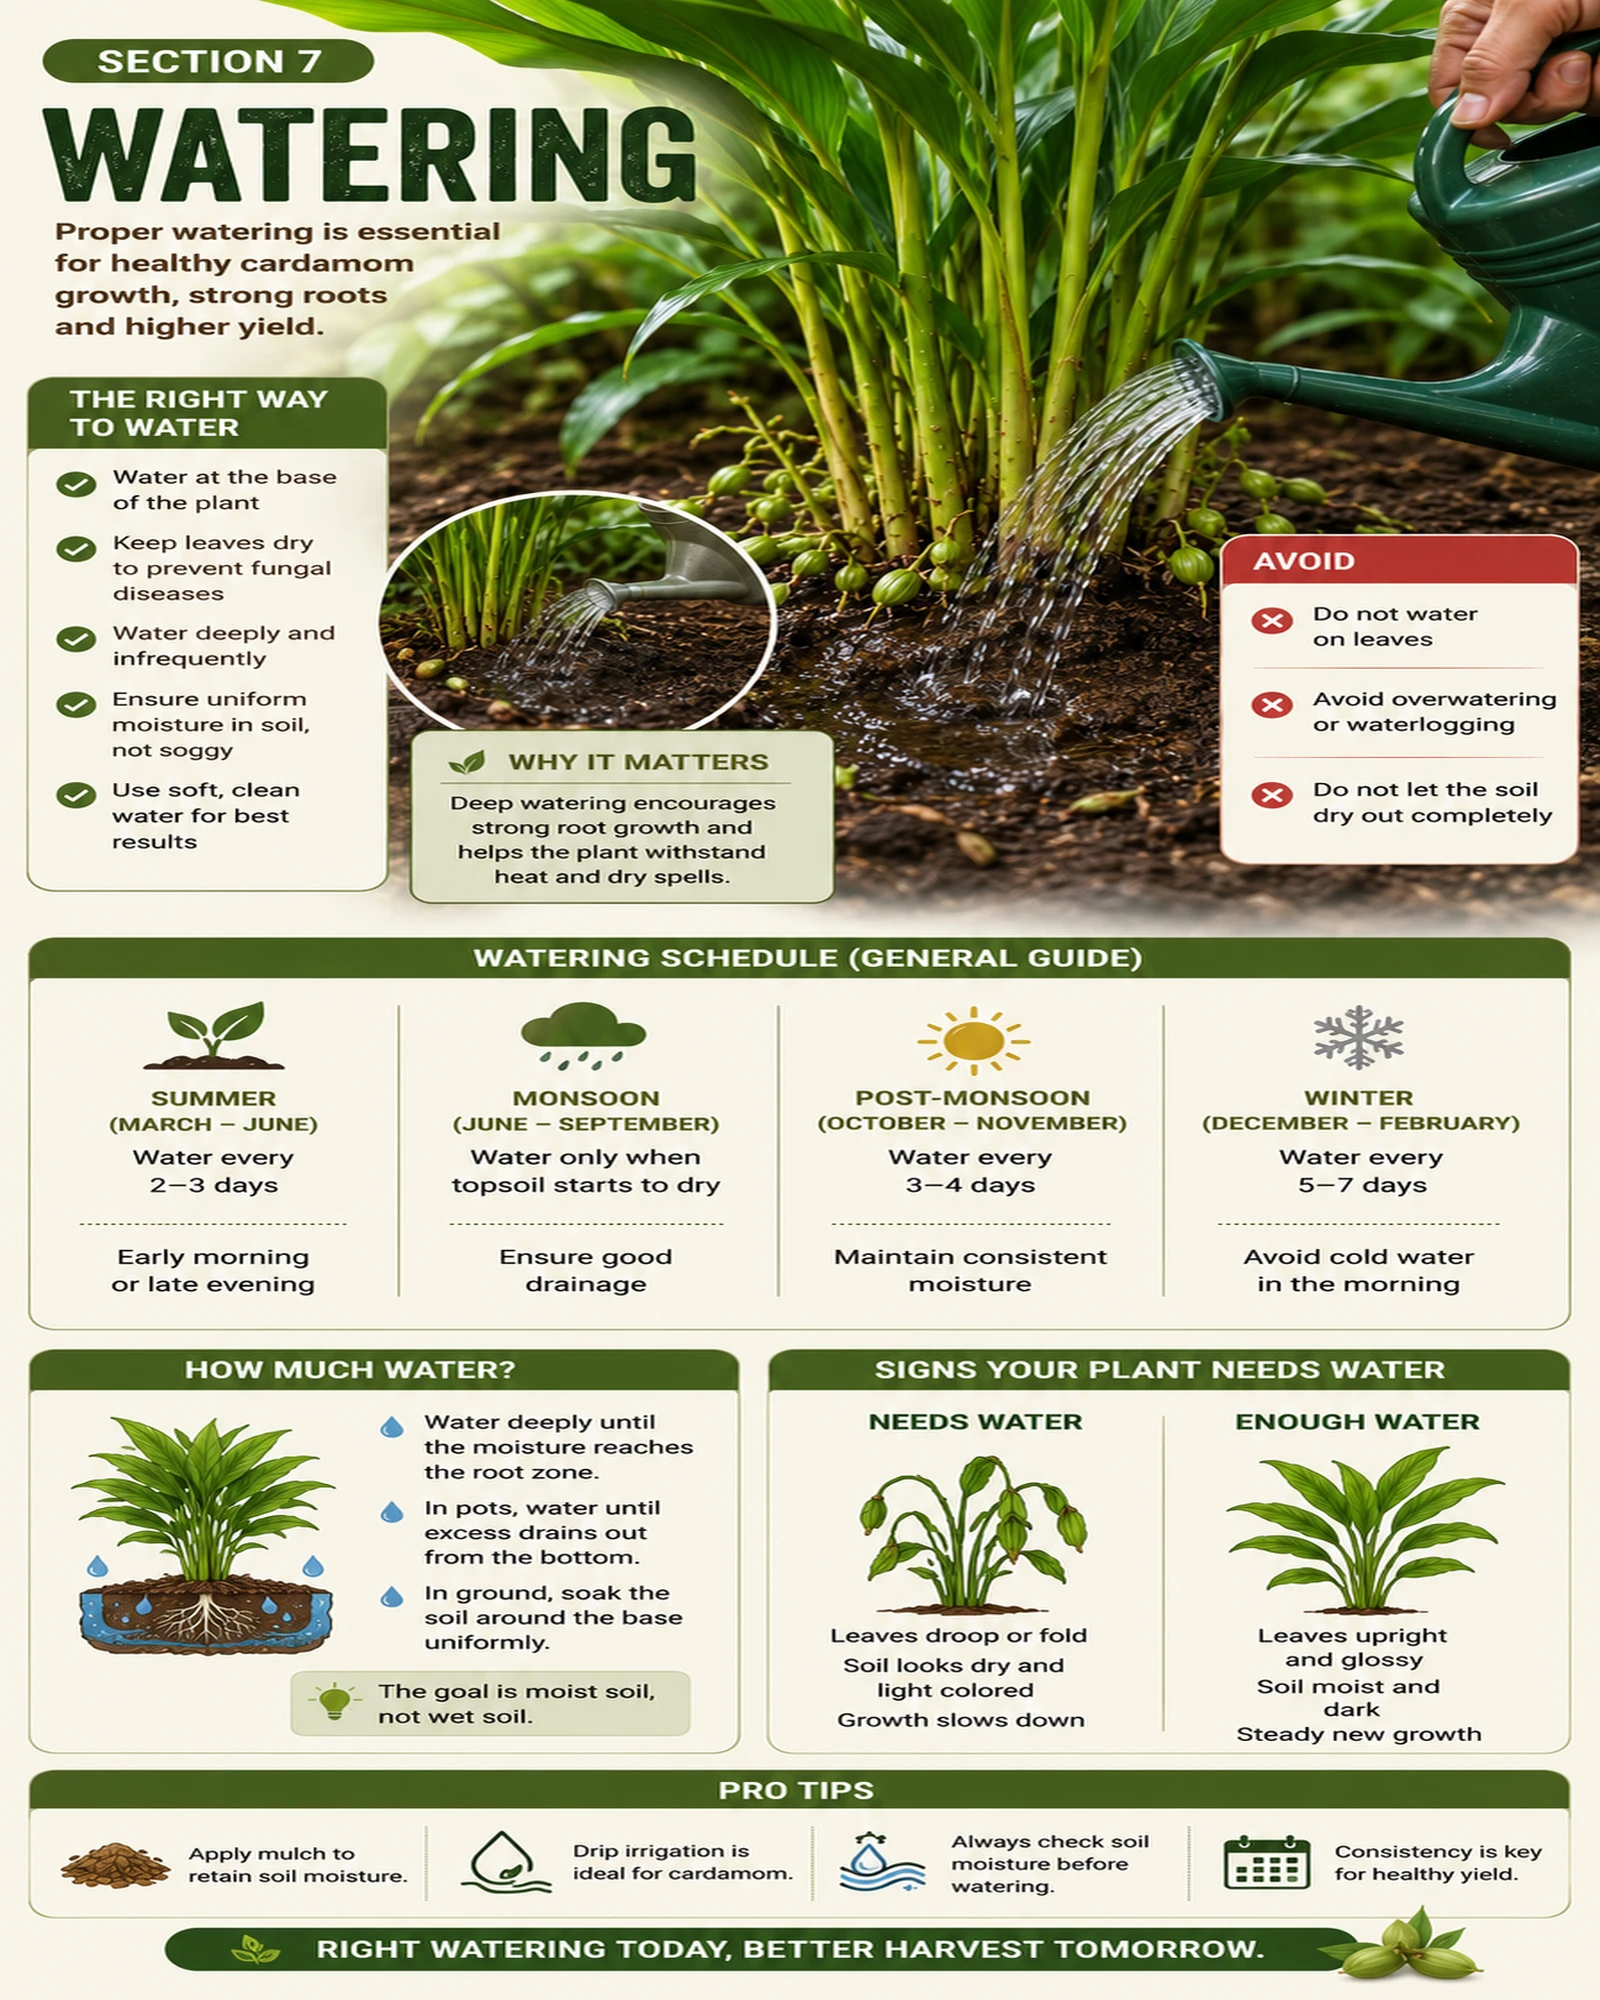
How to Water Cardamom — Frequency, Method, and Season
Cardamom needs consistent moisture without waterlogging — here is exactly howHow often to water cardamom: Water 2–3 times per week during summer growing season. Once per week in winter. Always check soil moisture 5cm down before watering — soil should be moist but not soggy. Cardamom dies faster from overwatering than underwatering.
Watering by Season
| Season | Frequency | Notes |
|---|---|---|
| Spring (growth starts) | 2× per week | Increase gradually |
| Summer (active growth) | 2–3× per week | Check soil daily in heat |
| Autumn (slowing) | 1–2× per week | Reduce as temps drop |
| Winter (dormancy) | Once per week | Allow top 3cm to dry slightly |
Signs of Overwatering
- Yellow lower leaves (first sign)
- Soft, mushy stem base
- Foul smell from soil (root rot)
- Wilting despite wet soil
Signs of Underwatering
- Leaf tips turning brown and crisp
- Leaves rolling inward
- Soil pulling away from pot edges
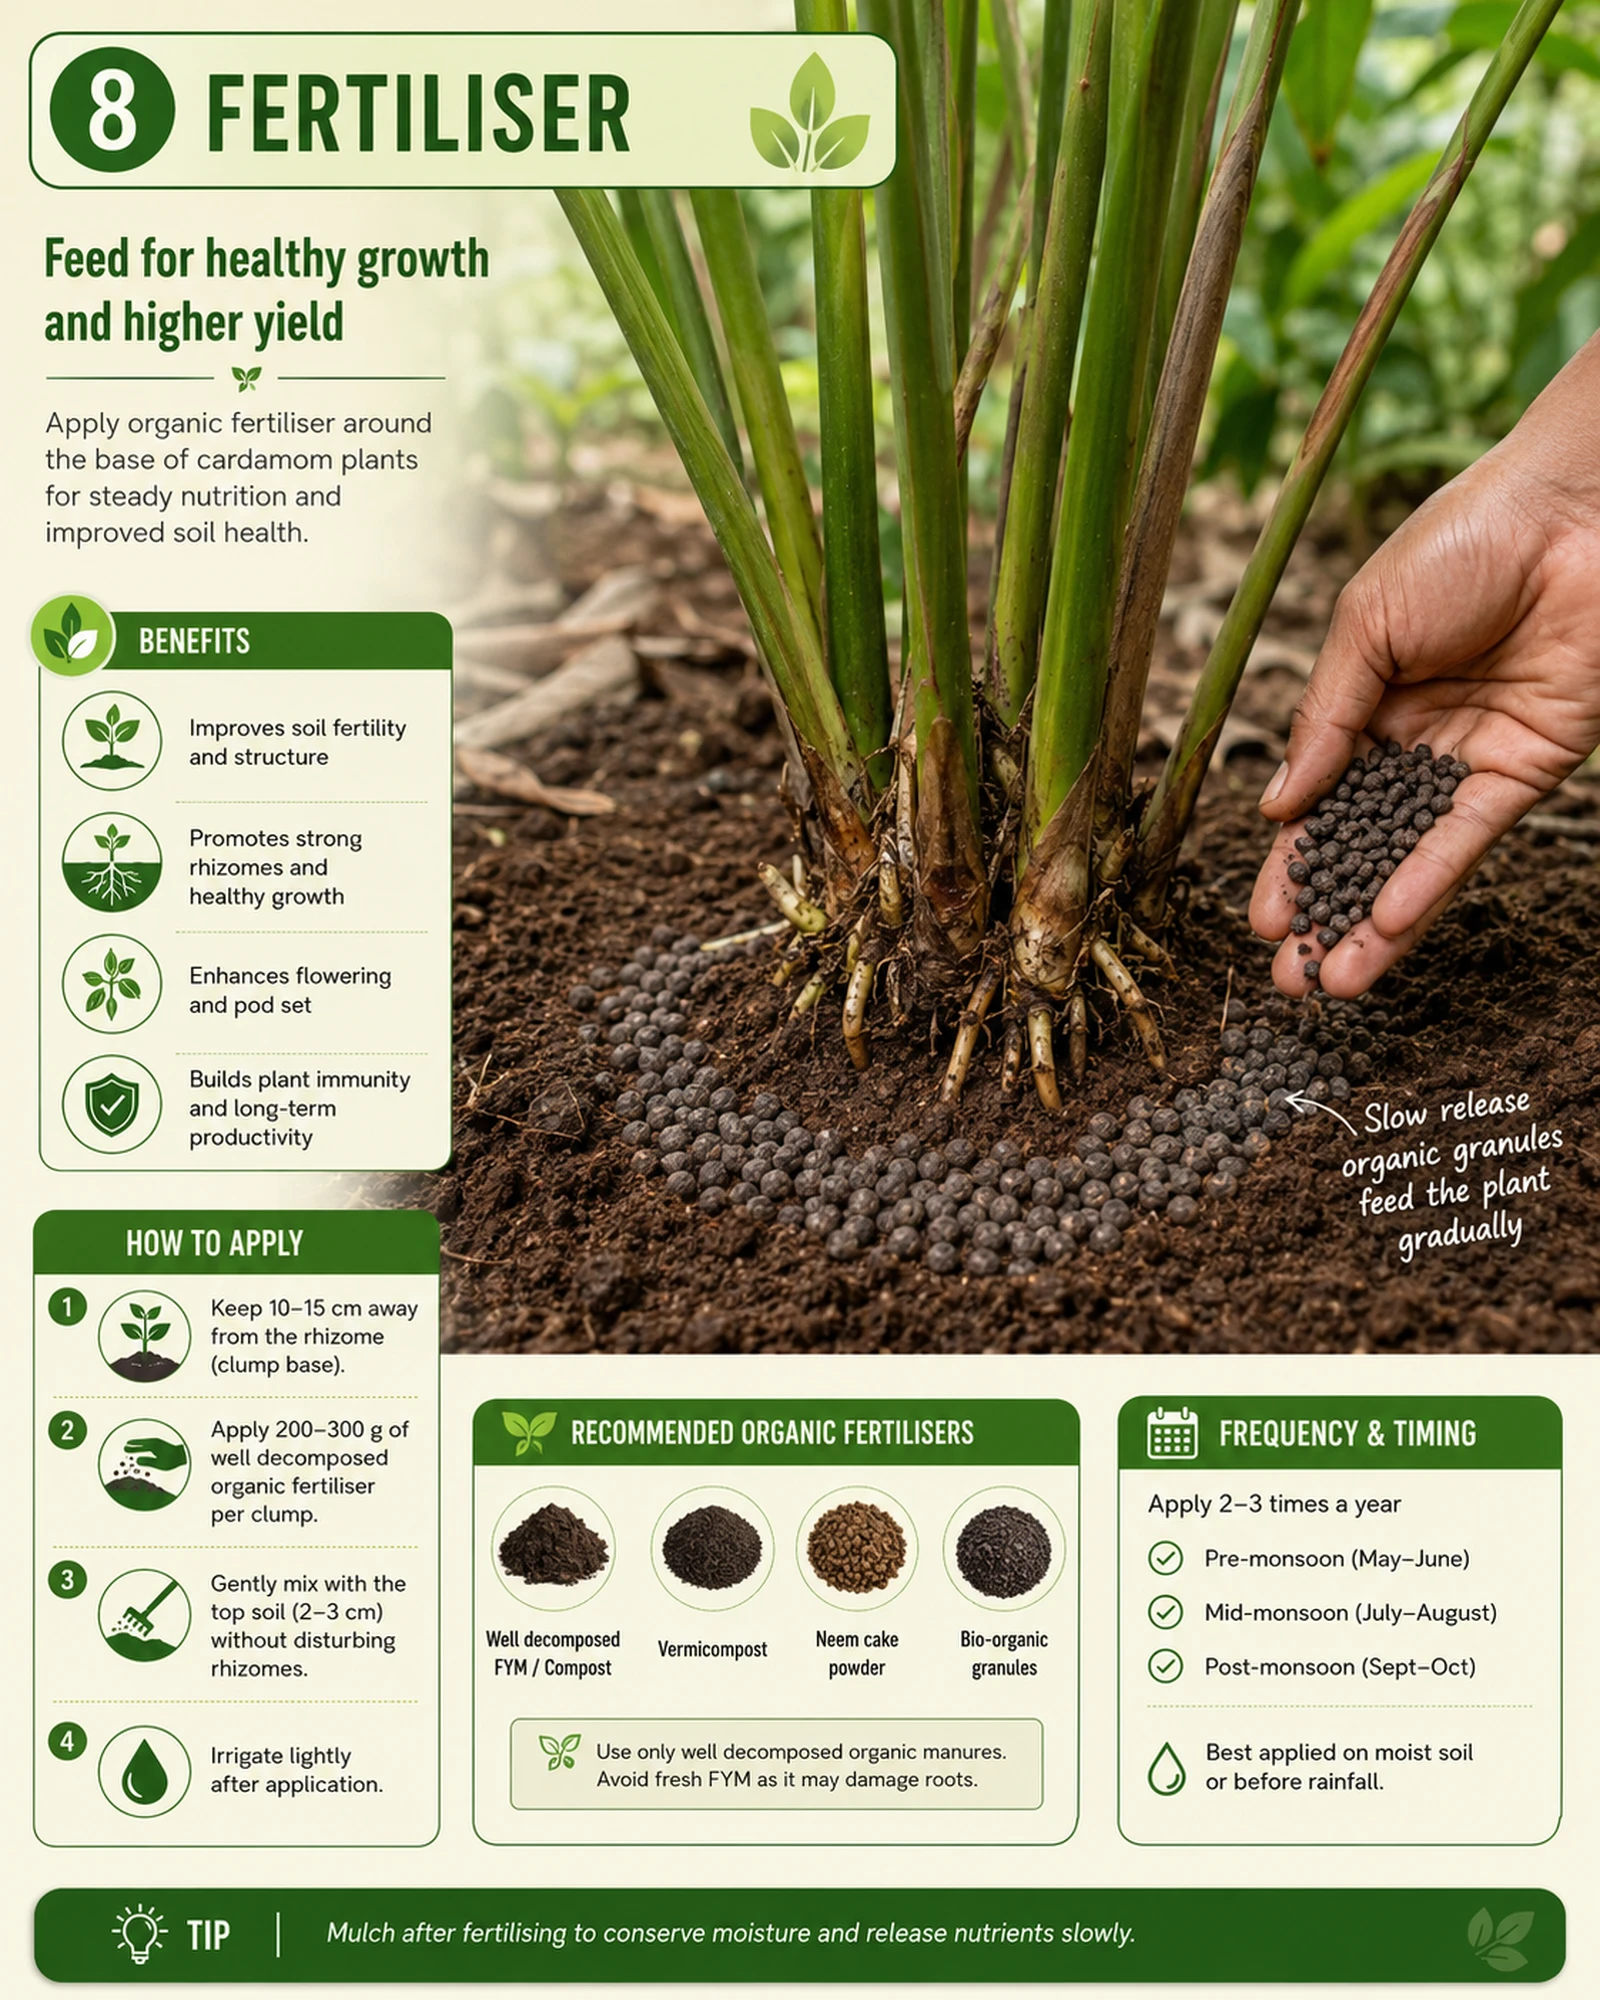
Cardamom Fertiliser — What to Feed, When, and How Much
NPK ratios, organic options, and feeding schedule for maximum pod productionCardamom fertiliser schedule: Feed with balanced NPK (10-10-10) every 6–8 weeks during growing season (spring to early autumn). Supplement with compost mulch annually. Reduce nitrogen once flowering begins — high nitrogen promotes leaves over pods.
Feeding Programme
| Stage | Fertiliser | Frequency |
|---|---|---|
| Early growth (year 1–2) | Balanced NPK 10-10-10 | Every 6 weeks |
| Established (pre-flowering) | Balanced NPK 10-10-10 | Every 8 weeks |
| Flowering & pod set | Low-N, higher P&K (5-10-10) | Every 8 weeks |
| Winter rest | No fertiliser | — |
| Annual mulch | Mature compost 5cm layer | Once per year (spring) |
Organic Options
- Neem cake: Excellent source of slow-release NPK plus pest-deterrent properties
- Fish emulsion: Fast-acting nitrogen boost for sluggish spring growth
- Seaweed extract: Provides micronutrients and improves stress tolerance
- Compost tea: Introduces beneficial microbes alongside mild nutrients
Cardamom Flowering, Pods, and the Flower-to-Fruit Timeline
What cardamom flowers look like, when they appear, and how pods developCardamom flower to fruit: The white flowers with purple/violet-striped lips appear at the base of the plant on horizontal racemes. Each flower opens for only 1–2 days. Pods begin forming immediately after pollination and are ready to harvest 35–40 days after flowering. Harvest when pods are plump, green, and firm — before they split open.
Why Cardamom Flowers at the Base
This surprises most growers. In its native habitat, cardamom flowers and fruits close to the ground so that fruit bats and ground-dwelling animals can access and disperse the seeds. The horizontal racemes carry both flowers and developing pods simultaneously — which means continuous harvesting is possible as different flowers open and pods develop at different rates on the same raceme.
Encouraging Flowering in Reluctant Plants
- Ensure the plant is at least 2–3 years old — younger plants rarely flower
- Reduce watering slightly in late autumn to simulate a brief dry period — this often triggers flowering in spring
- Move outdoor-suitable pots to a position with marginally more light in summer
- Ensure phosphorus levels are adequate — phosphorus is critical for flower and pod development
- Avoid pruning or disturbing the base of the plant where racemes emerge
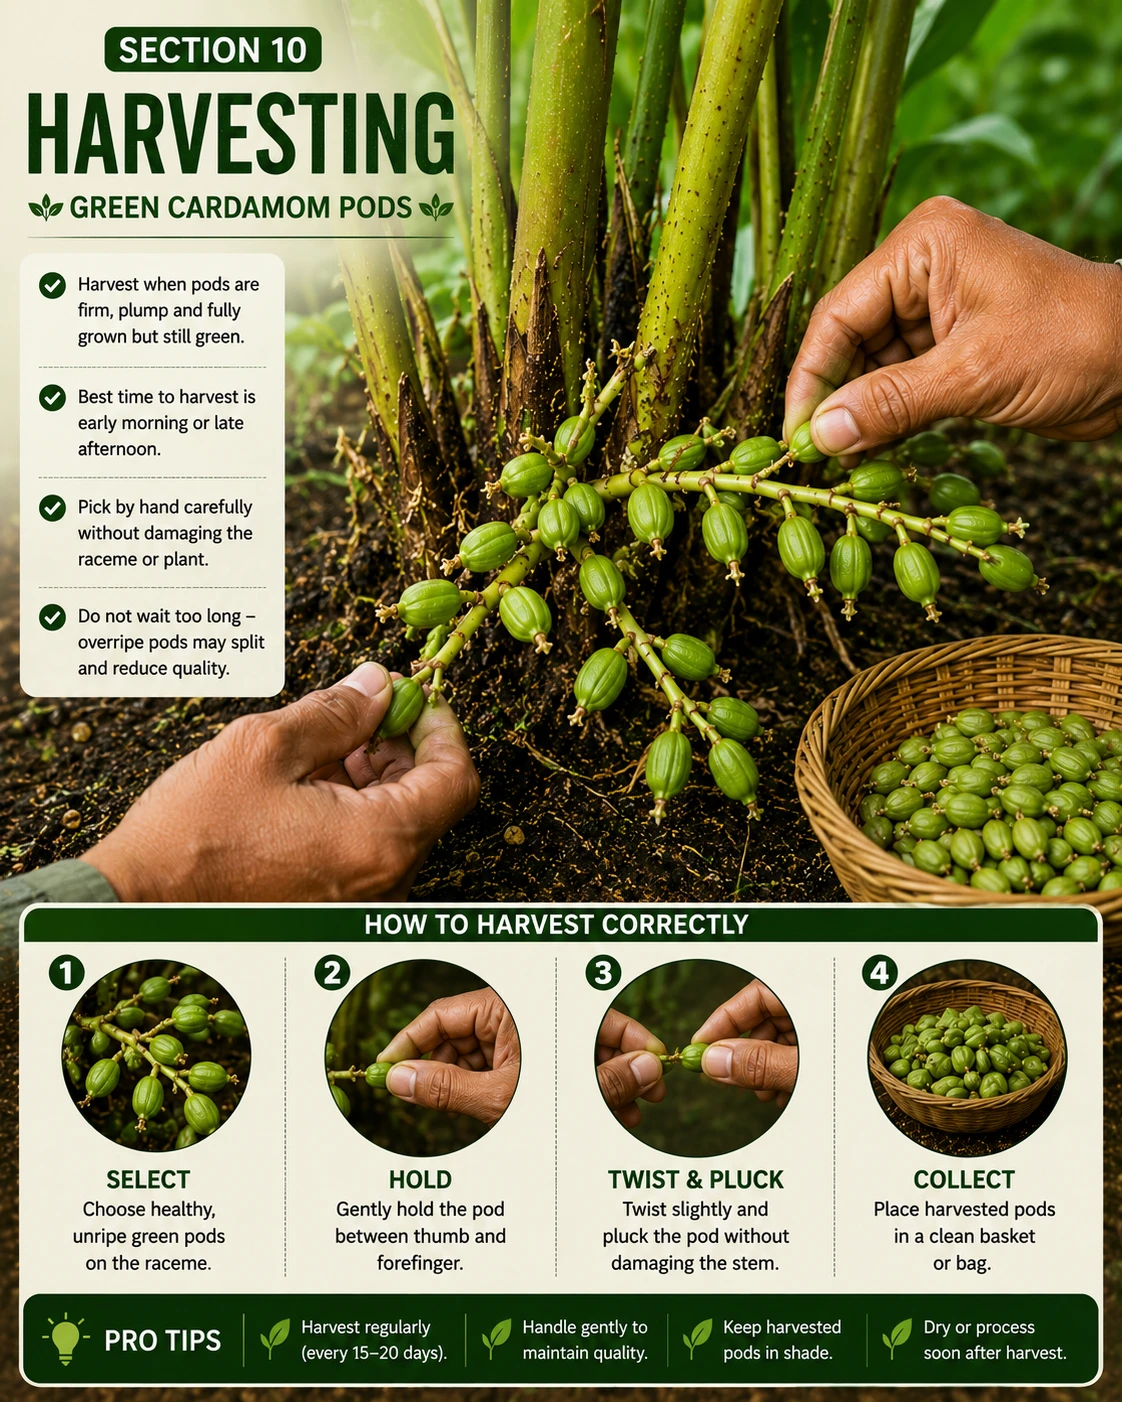
Harvesting Cardamom — When, How, and Curing
Knowing exactly when to harvest is the difference between aromatic pods and empty husksWhen to harvest cardamom: Harvest green cardamom pods when they are plump, firm, and bright green — approximately 35–40 days after flowers open. Do not wait until pods turn yellow or begin to split. At that stage, the volatile oils have already begun to degrade. In commercial production, pods are harvested 3–4 times per season as different pods on each raceme mature at different rates.
Harvesting Technique
Identify ripe pods
Select pods that are green, plump, and firm. They should not be yellow, soft, or beginning to split. Ripe pods feel solid when gently squeezed.
Snip the entire raceme
Use clean scissors or secateurs. Cut the entire raceme (stem carrying the pods) close to the base. Do not pull — this damages the rhizome and future pod production.
Remove individual pods
Separate individual pods from the raceme. Sort by size and colour — uniform green pods give the best flavour and keeping quality.
Cure and dry
Dry freshly harvested pods in the shade for 5–7 days. Do not sun-dry — UV exposure degrades volatile oils rapidly. Store in an airtight container once dried.
Cardamom Pests and Plant Problems — Diagnosis and Treatment
Every common cardamom problem identified with causes and solutions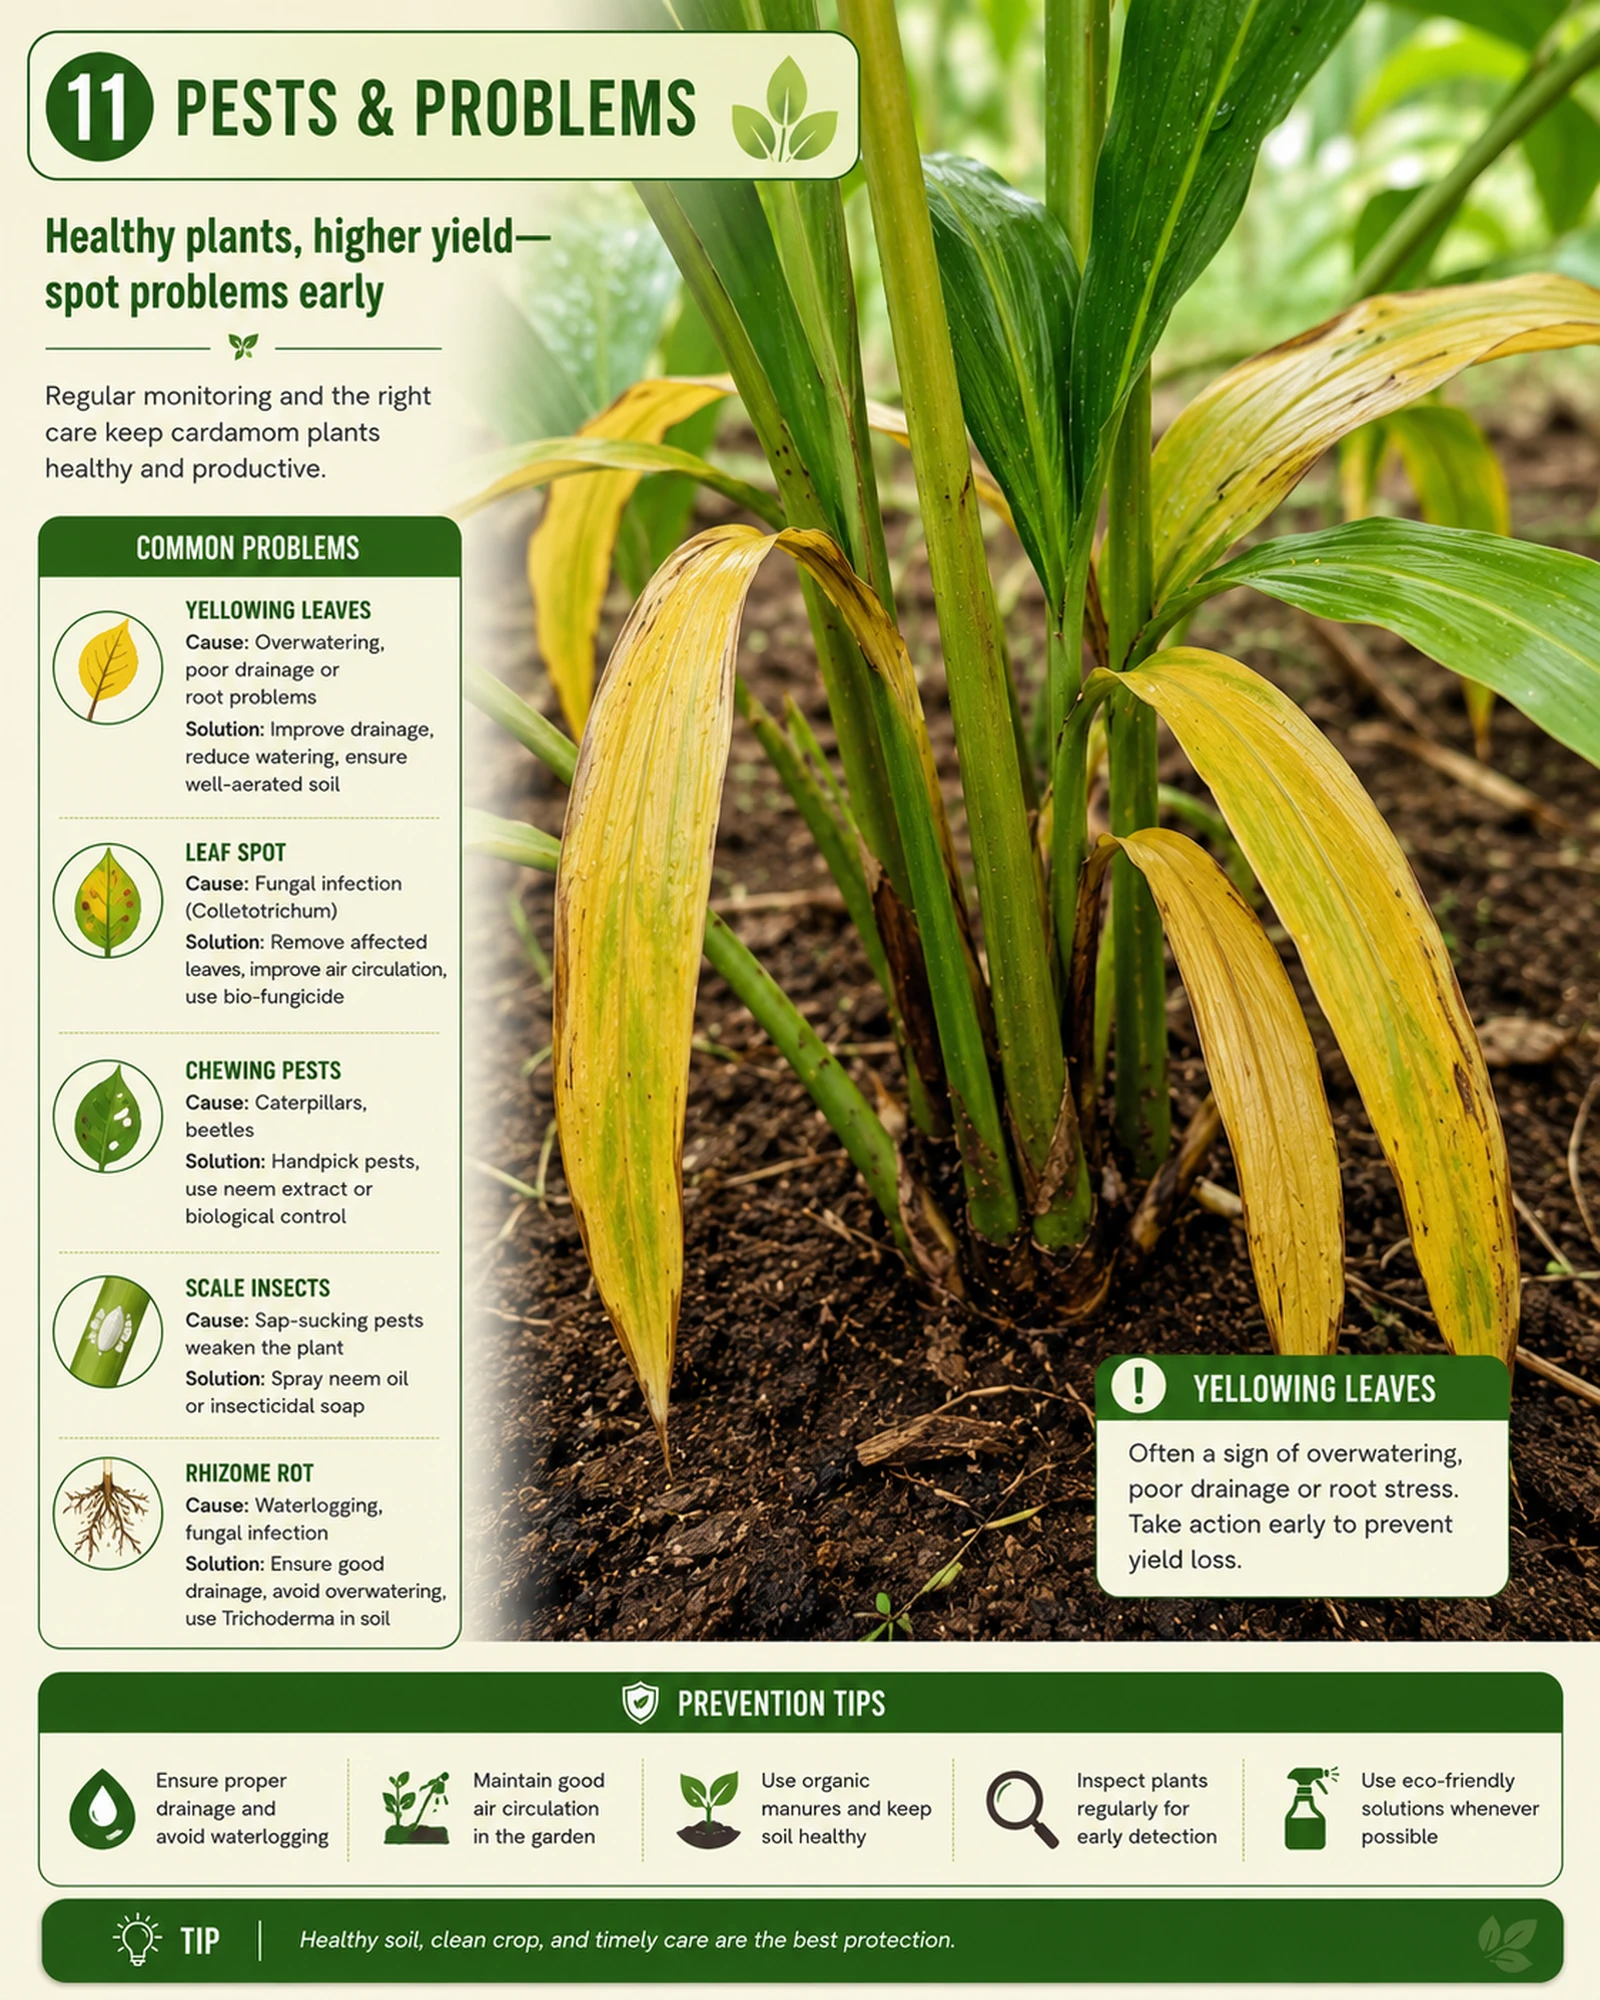
Common Problems at a Glance
| Symptom | Likely Cause | Action |
|---|---|---|
| Yellow lower leaves | Overwatering / root rot | Reduce watering, check drainage |
| Brown leaf tips | Low humidity or underwatering | Mist leaves, check soil moisture |
| No flowers | Too young, or low phosphorus | Wait until year 2–3, feed P&K |
| Wilting in wet soil | Root rot (Pythium) | Repot in fresh, well-draining mix |
| White coating on leaves | Powdery mildew | Improve air circulation, neem spray |
| Sticky leaves, webbing | Spider mites (dry conditions) | Increase humidity, neem oil spray |
| Rotting stem base | Rhizome rot | Remove affected tissue, treat with copper fungicide |
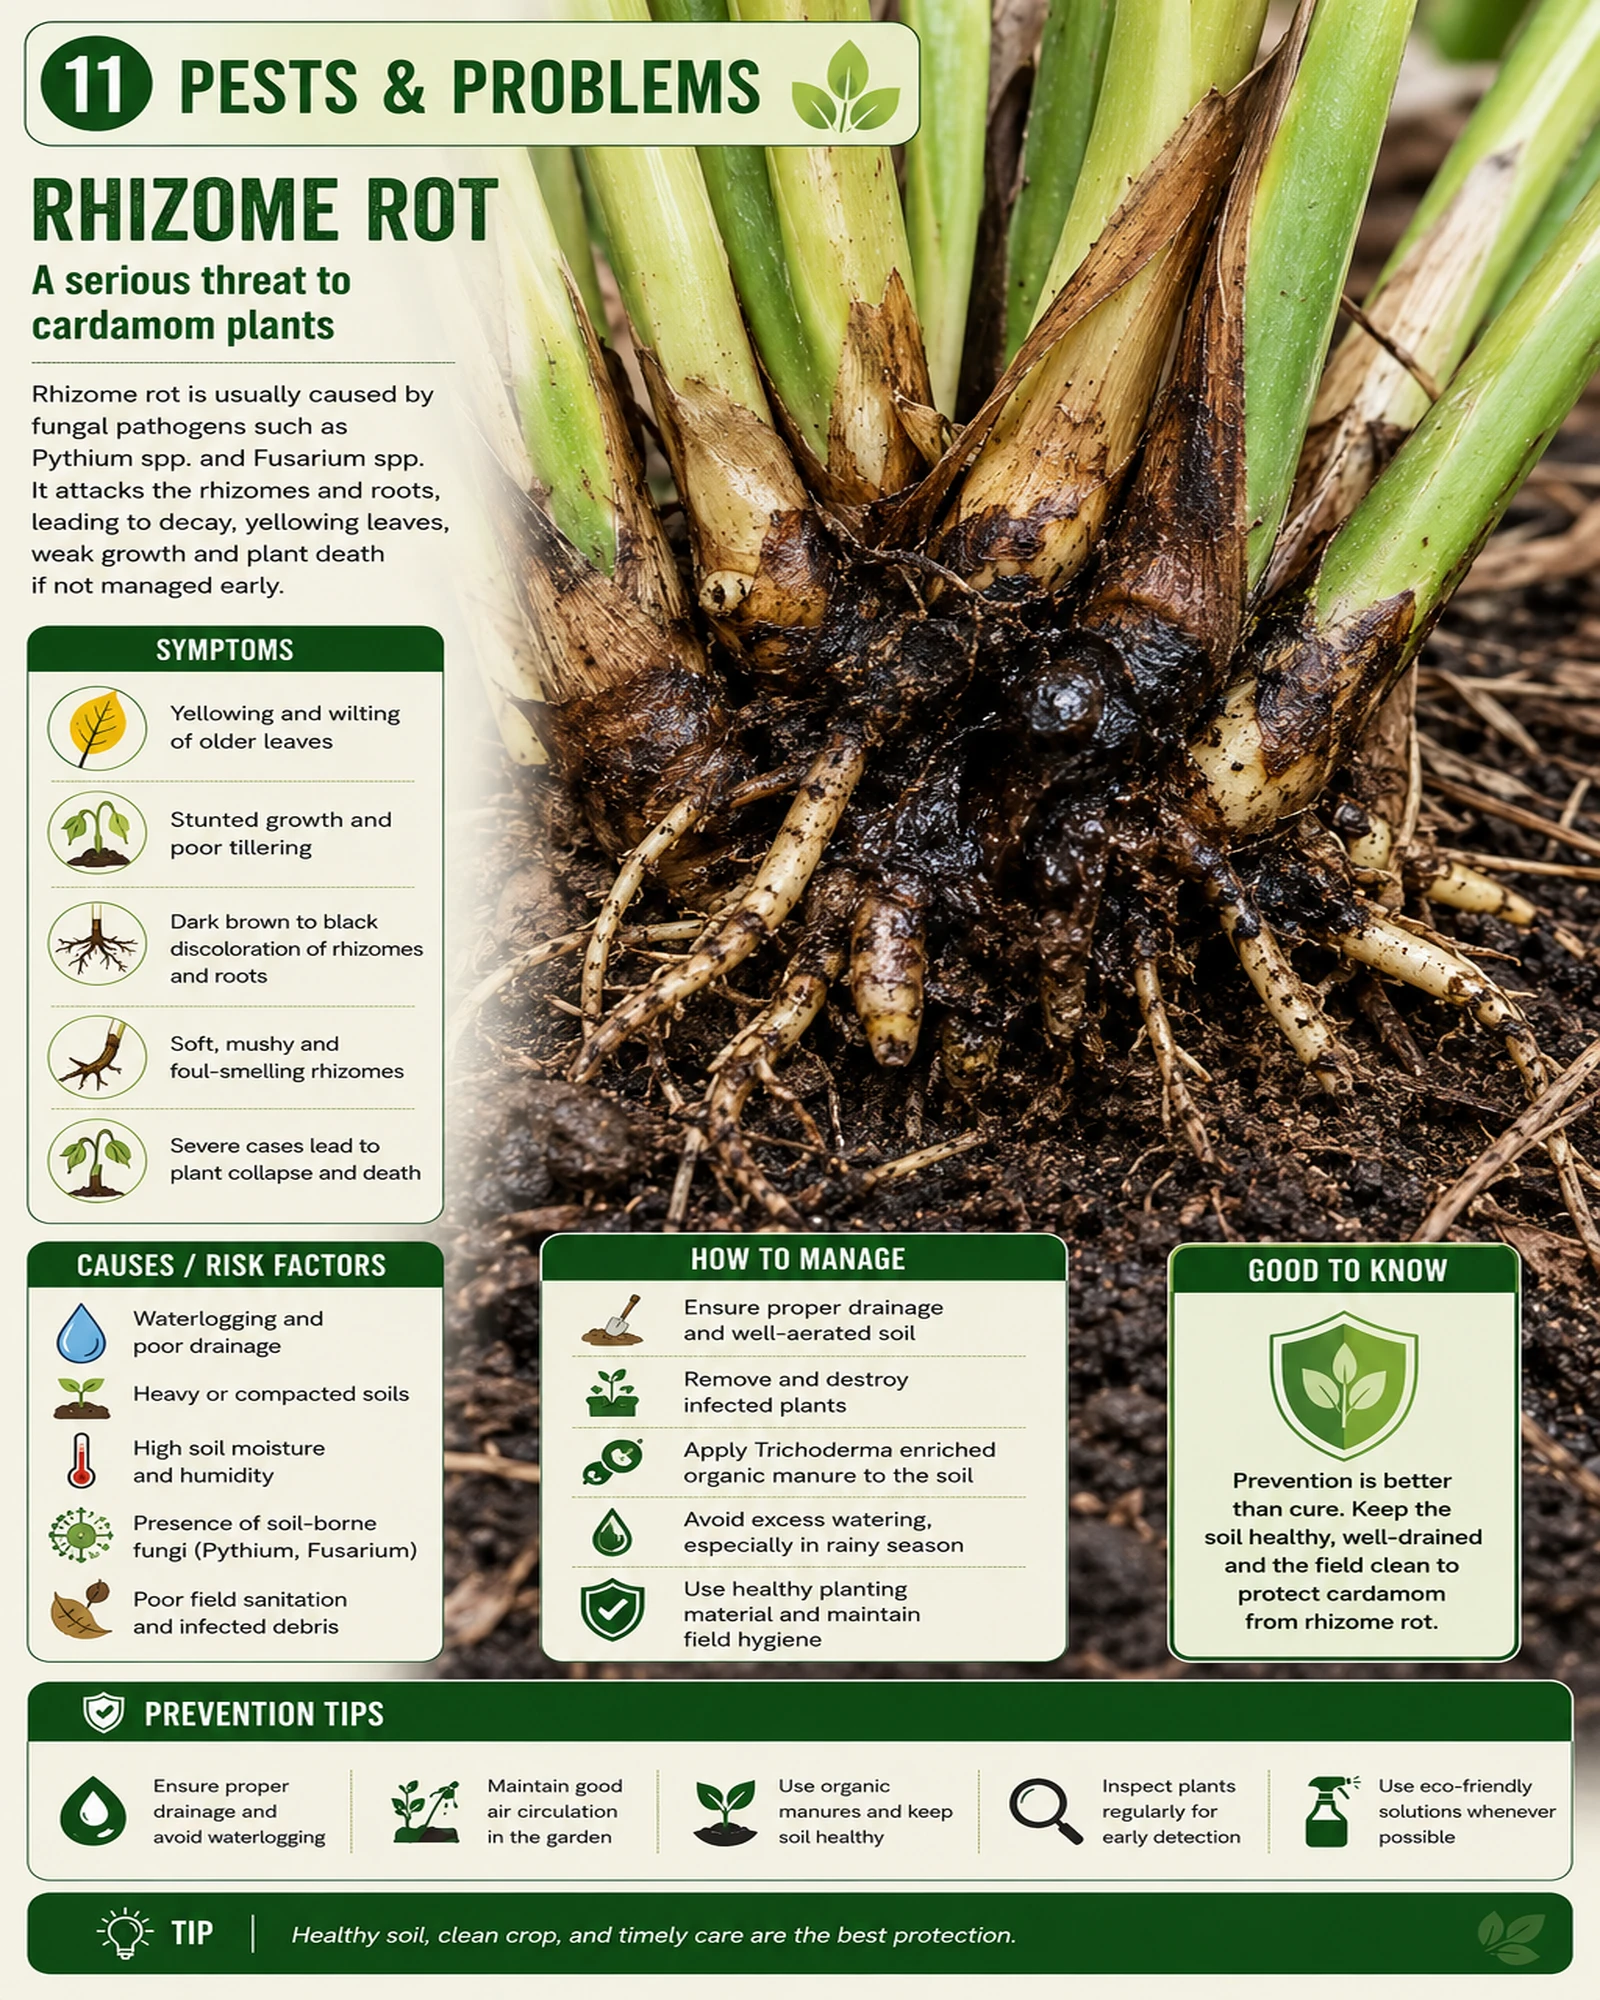
Rhizome Rot — The Most Serious Problem
Rhizome rot caused by Pythium vexans is the most damaging disease of cardamom. The rhizome turns dark and mushy, the pseudostems collapse, and the plant dies rapidly. Prevention is essential — there is no effective cure once advanced.
Prevention: Never waterlog the soil. Ensure excellent drainage. Use neem cake in your potting mix as a biological deterrent. Remove any damaged or dead pseudostems immediately to prevent spread.
All Cardamom Growing Guides — Complete Topic Index
Every specialist guide in the CardamomNectar growing siloGrow Cardamom from Seed
Full germination guide: soak, sow, and raise seedlings from scratch.
→ Complete GuideGrow Cardamom from Rhizome
Faster method: dividing established rhizomes for 85–95% success rate.
→ Complete GuideGrow Cardamom Indoors
Houseplant method — humidity, light placement, and flowering tips.
→ Complete GuideGrowing Cardamom in Pots
Container selection, potting mix, drainage, and repotting cycle.
→ Complete GuideBest Soil for Cardamom
Exact mix recipe, pH testing, and amendments for pot or garden.
→ Complete GuideHow to Water Cardamom
Frequency, technique, and seasonal adjustments to prevent rot.
→ Complete GuideCardamom Fertiliser Guide
NPK ratios, organic options, and complete feeding schedule.
→ Complete GuideCardamom Plant Care
Year-round care calendar — what to do every month.
→ Complete GuideCardamom Plant Problems
Yellow leaves, wilting, rot — every symptom diagnosed and treated.
→ Complete GuideCardamom Pests
Spider mites, thrips, aphids — identification and organic treatment.
→ Complete GuideThe Cardamom Plant
Botanical profile, parts of the plant, and varieties of Elettaria.
→ Complete GuideGrowing Cardamom in USA
Zone-by-zone guide for all 50 states — outdoor and indoor methods.
→ Complete GuideGrow Cardamom in the UK
Greenhouse and indoor method for the UK climate — ranked #1.
→ Complete GuideGrow Cardamom in India
State-by-state growing guide for India’s diverse climates.
→ Complete GuideGrow Cardamom in Australia
Queensland, NSW, NT — outdoor growing in Australia’s tropical north.
→ Complete GuideHow to Grow Cardamom — Frequently Asked Questions
Every common question answered — featured snippet optimisedAbout the Author & Reviewer
Written by a spice & plant researcher — reviewed by a botanical Ph.D.
Emily Rhodes is a culinary writer specialising in South Asian spices and tropical plant cultivation. She has spent years testing cardamom growing methods across different climates and soil types to produce the practical, field-tested guidance used in these guides.
View full profile →
Dr. Bennett holds a doctorate in Botanical Sciences specialising in Zingiberaceae. He verified all botanical data, growing condition parameters, and cultivation recommendations against IISR standards and peer-reviewed literature on Elettaria cardamomum cultivation.
View full profile →Also in the Cardamom Growing Series
Dive deeper into any specific topicThe Cardamom Plant — Full Botanical Guide
Parts, varieties, and what makes Elettaria cardamomum unique
What Is Cardamom?
Complete introduction to green and black cardamom
Cardamom Pods — Complete Guide
Grades, uses, and how to buy the best pods
Cardamom Health Benefits
Evidence-based review of elaichi’s medicinal uses
Cardamom Tea Guide
How to brew elaichi tea with your home-grown cardamom
Cardamom Seeds to Ground Conversion
Convert your fresh harvest to ground cardamom accurately